Symedia + FastEmby:Emby 115 直链神器
文章信息
- 文章来源: @Jamision
- 原文链接: Symedia + FastEmby:Emby 115 直链神器
一. 前言
注意:需要留空 两个 cookie,CloudDrive2,Symedia 各一个
已经购买作者的激活码可以部署,如没购买可以前往作者项目地址
💳 购买方式:
- 前往https://www.symedia.top/donate
- 扫描页面中的赞助二维码进行付款
- 付款时请备注您的邮箱地址
- 将付款截图和邮箱发给作者
- 激活码将发送至您提供的邮箱
二. 介绍
✨ Symedia 核心功能:
- 🔥 链接同步: 同步本地 / 网盘文件夹,生成 Strm / 软链接,同步元数据到指定文件夹
- 🔥 STRM 快速生成:快速生成 STRM 文件,节省本地存储空间
- 🔥 秒级监控:基于 CloudDrive2 的 Webhook 的无索引监控,告别传统轮询
- 🔥 智能整理:视频文件自动识别、重命名、分类您的媒体文件
- 🔥 元数据刮削:自动获取影片信息,让您的媒体库更专业
- 🔥 完美对接: 同步生成 Strm / 软链接后,会自动通知 Emby 进行扫库,并发送入库通知
- 🔥 插件功能: 提供与媒体库相关的各种功能插件,持续更新中
三. 效果预览

四. 相关地址
Docker Hub:
五. 部署教程
1. CloudDrive2
1.1 Docker CLI
1.2 Docker Compose
version: "3"

services:
  cloudnas:
    image: cloudnas/clouddrive2:latest # 拉取最新镜像
    container_name: clouddrive2 # 容器名称
    restart: unless-stopped # 重启策略
    privileged: true # 特权模式
    pid: "host" # 使用宿主机的 PID 命名空间
    deploy:
      resources:
        limits:
          cpus: "4" # 限制容器最多使用 4 个 CPU
          memory: 4G # 限制容器最多使用 4GB 内存
    environment:
      - TZ=Asia/Shanghai # 容器时区
      - PUID=0 # 运行程序的用户 ID
      - PGID=0 # 运行程序的用户组 ID
      - CLOUDDRIVE_HOME=/Config # 指定 CloudDrive 的配置文件目录
    devices:
      - /dev/fuse:/dev/fuse # 允许容器使用 FUSE 设备(用于挂载文件系统)
    ports:
      - "19798:19798" # 映射端口:主机 19798 -> 容器 19798
    volumes:
      - /volume1/docker/cd2/config:/Config # 映射 配置文件夹
      - /volume1/docker/CloudNAS:/CloudNAS:shared # 映射 本地可挂载的目录,并共享访问权限
2. Symedia
2.1 Docker CLI
2.2 Docker Compose
version: "3"
services:
  symedia:
    image: shenxianmq/symedia:latest # 拉取最新镜像
    container_name: symedia # 容器名称
    restart: always # 重启策略
    environment:
      - TZ=Asia/Shanghai # 容器时区
      - LICENSE_KEY='' # 作者发的激活码
    ports:
      - "8095:8095" # 映射端口:主机 8095 -> 容器 8095
    volumes:
      - /var/run/docker.sock:/var/run/docker.sock:ro # Docker 宿主机通信
      - /volume1/docker/symedia/config:/app/config # 映射 sa 配置路径
      - /volume1/docker/CloudNAS:/CloudNAS:rslave # 映射 cd2 的本地路径
      - /volume1/Media:/Media # 映射 本地媒体目录,检查路径外的映射和链接同步的目录路径以及大小写是否一致
3. FastEmby
3.1 Docker CL
3.2 Docker Compose
version: "3"

services:
  FastEmby:
    image: shenxianmq/fastemby:latest # 使用最新镜像
    container_name: FastEmby # 容器名称
    restart: unless-stopped # 重启策略
    network_mode: host # 网络模式
    environment:
      - TZ=Asia/Shanghai # 环境变量:容器时区
      - CHECKIN=0 # 关闭 115 自动签名
    volumes:
      - /volume1/FastEmby/config:/app/config # 映射 配置文件夹
      - /volume1/FastEmby/log:/app/log # 映射 日志文件夹
4. Emby
4.1 Docker CLI
4.2 Docker Composer
version: "3"

services:
  emby_server:
    image: emby/embyserver:latest # 使用最新镜像
    container_name: emby_server # 容器名称
    restart: unless-stopped # 重启策略
    network_mode: bridge # 网络模式
    environment:
      - PUID=0
      - PGID=0
      - NO_PROXY=172.17.0.1,127.0.0.1,localhost # 环境代理
      - ALL_PROXY=http://x.x.x.x:x # 环境代理
      - HTTP_PROXY=http://x.x.x.x:x # 环境代理
    ports:
      - "8096:8096" # 映射端口:主机 8096 -> 容器 8096
    volumes:
      - /volume1/docker/emby:/config # 映射 配置文件夹
      - /volume1/docker/CloudNAS:/CloudNAS:rslave # 映射 cd2 的本地路径,需与 sa 挂载一致,否则不可播放
      - /volume1/Media:/Media # 映射 媒体目录,需挂载
六. 使用教程
1. CloudDrive 2
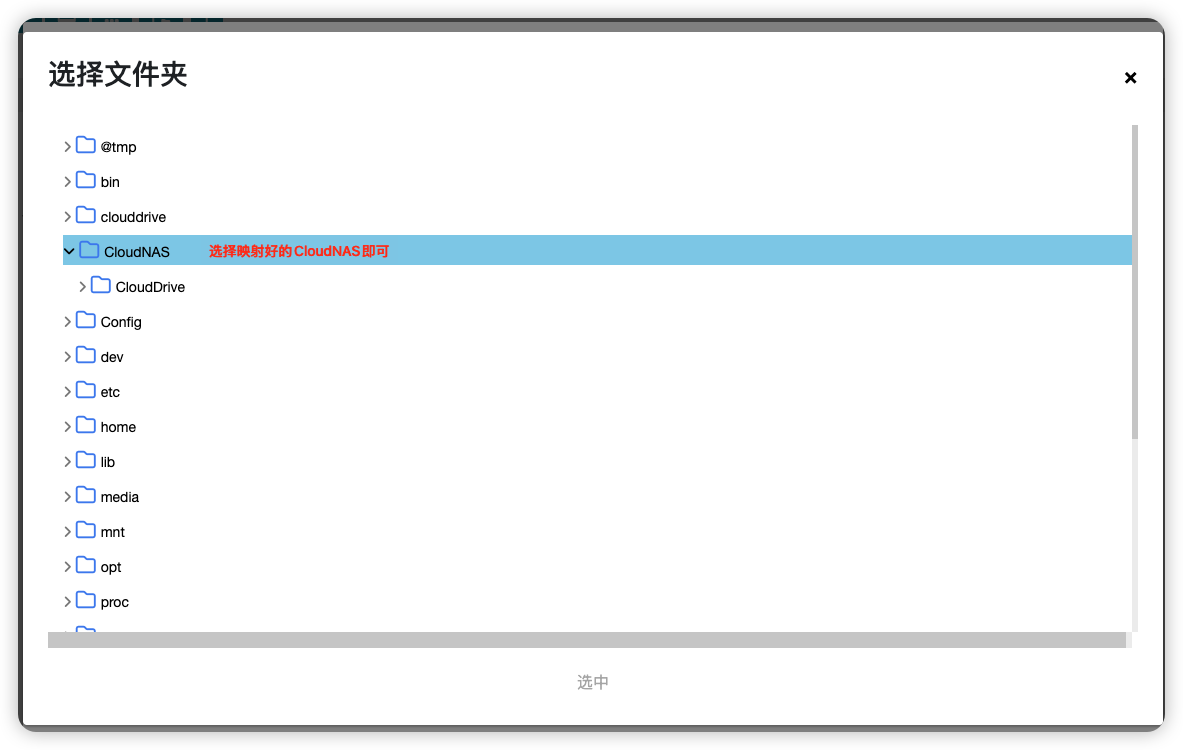
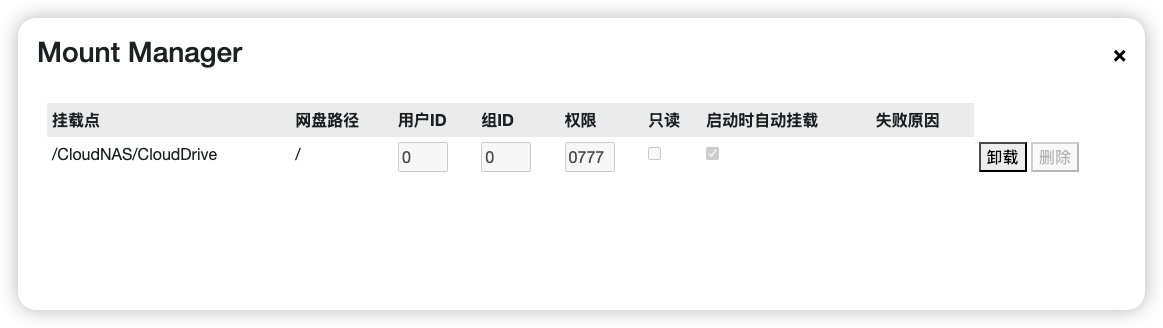
1.1 挂载配置
注意:记得挂载网盘的【根目录】,否则后期容易出现各种文件夹路径权限的错误,掉盘也无法通过 sa 去刷新
2. Symedia
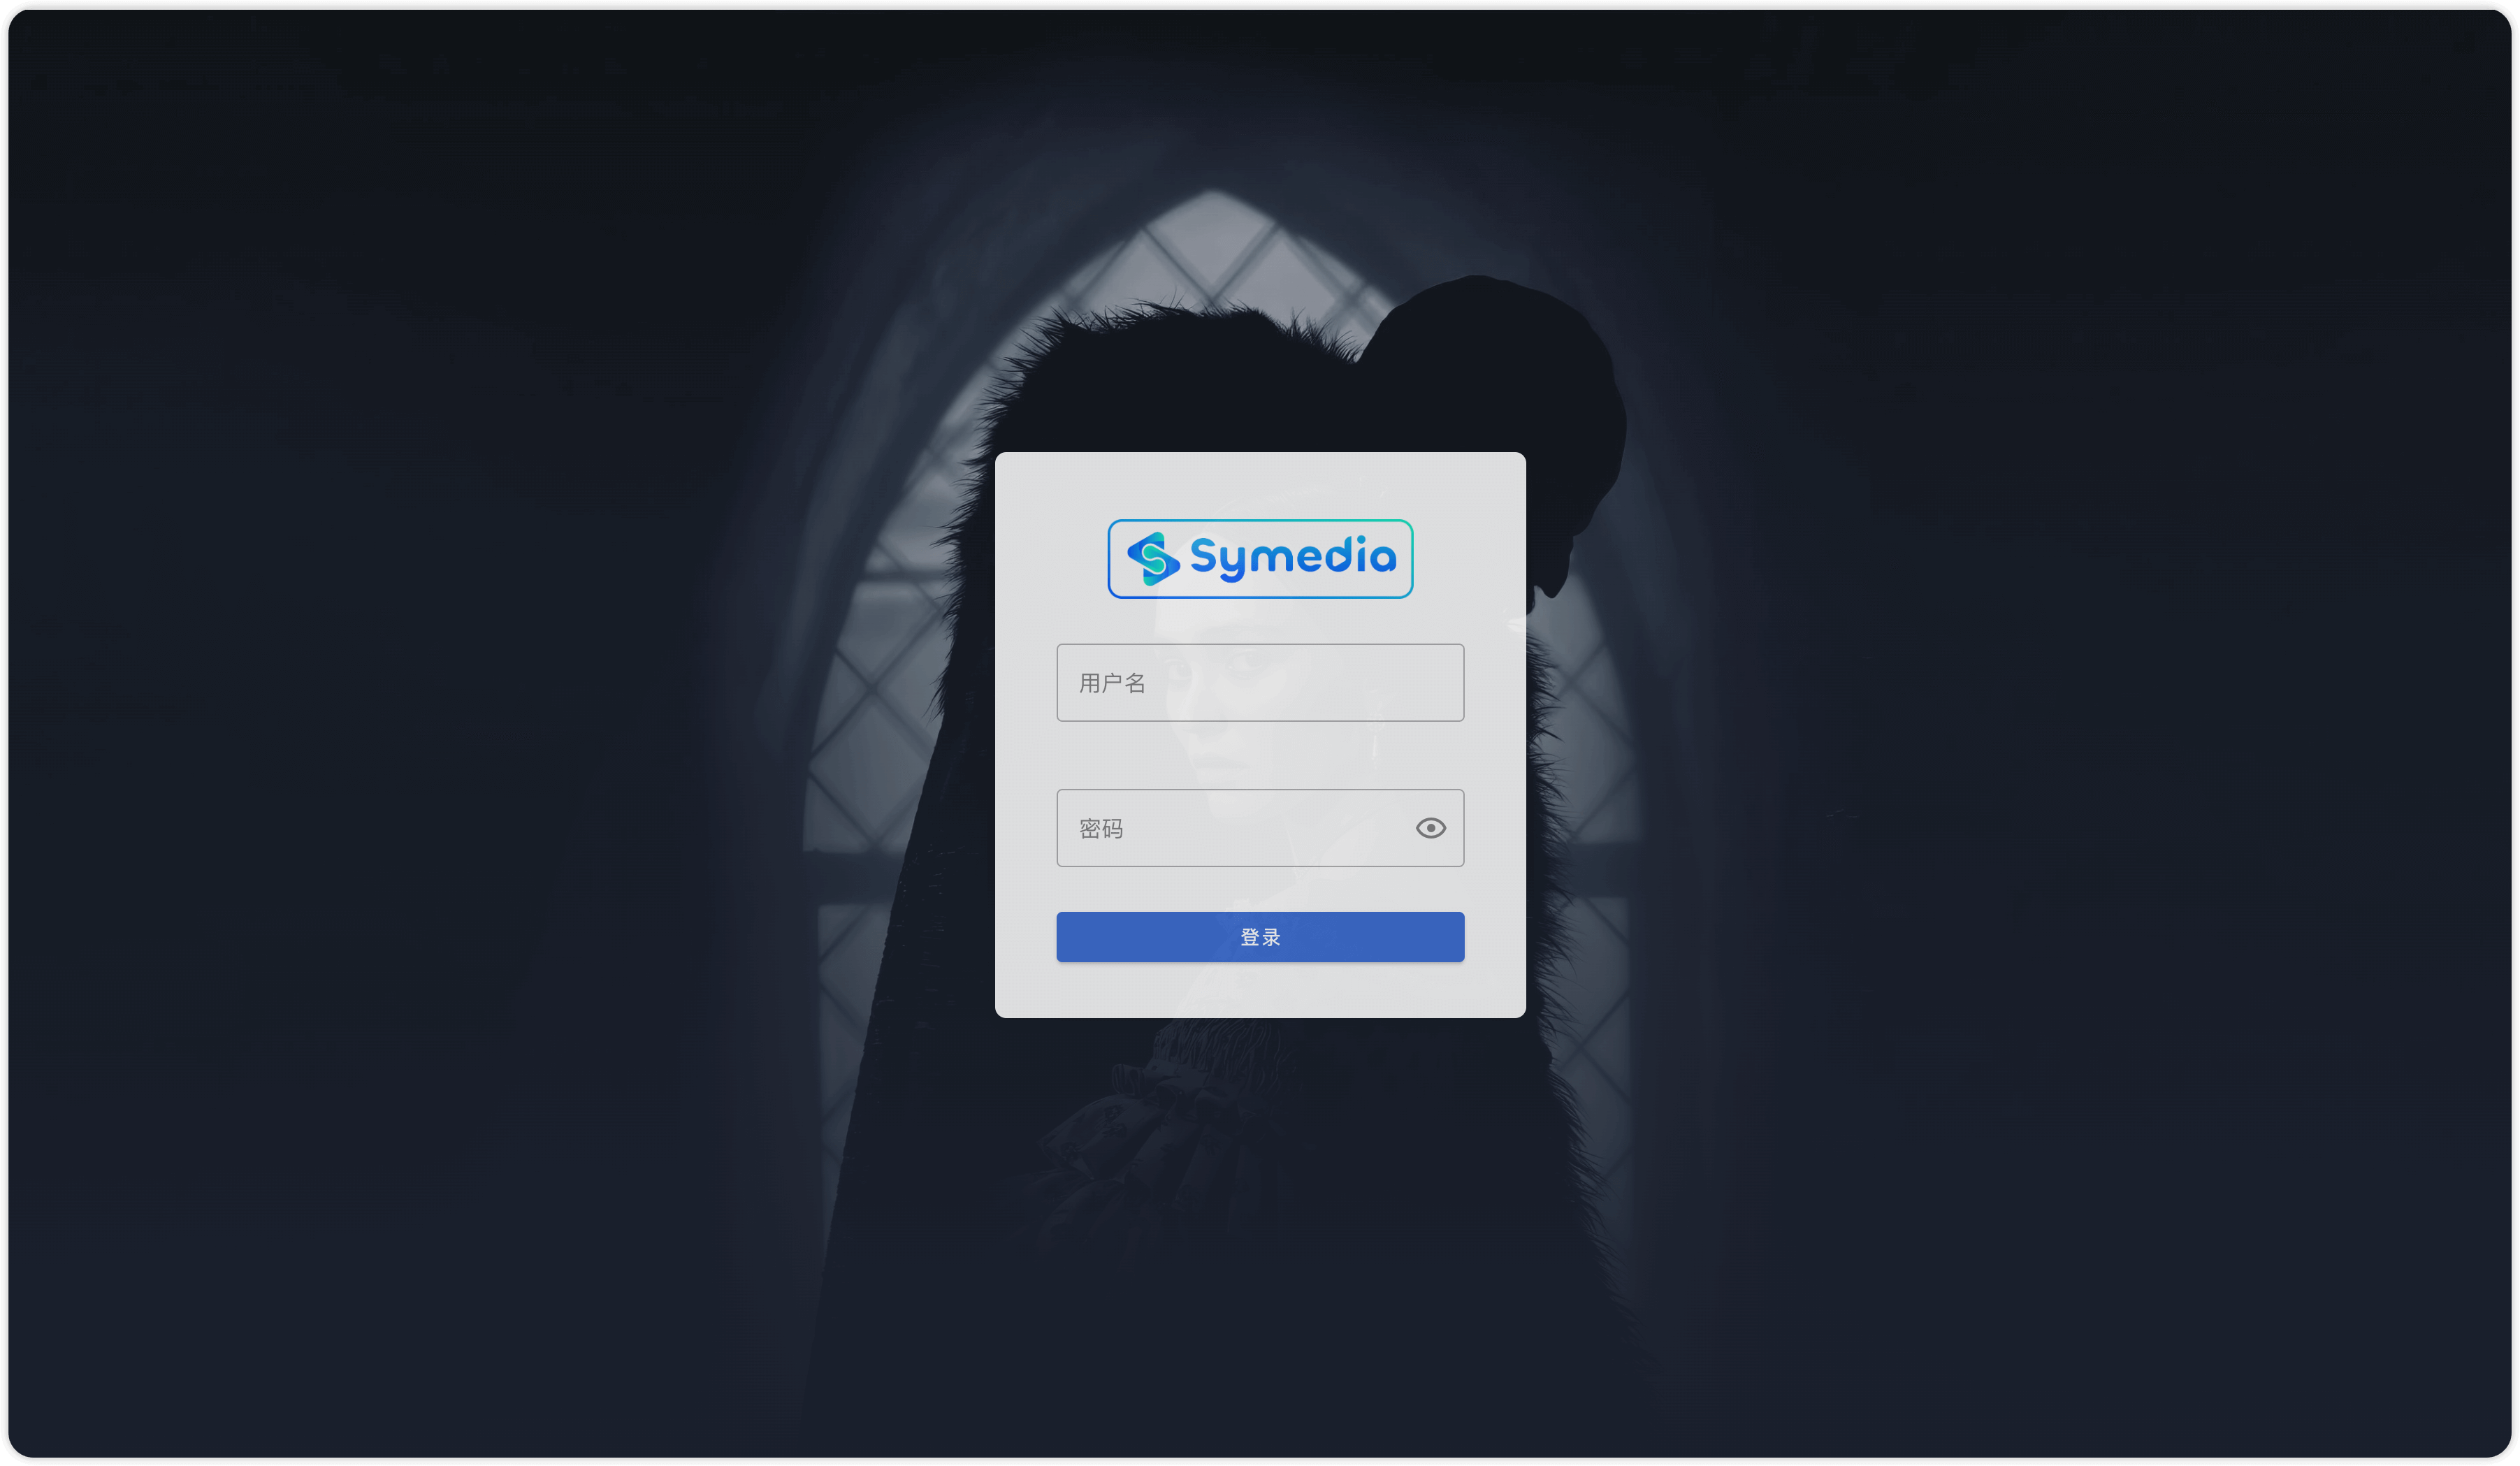
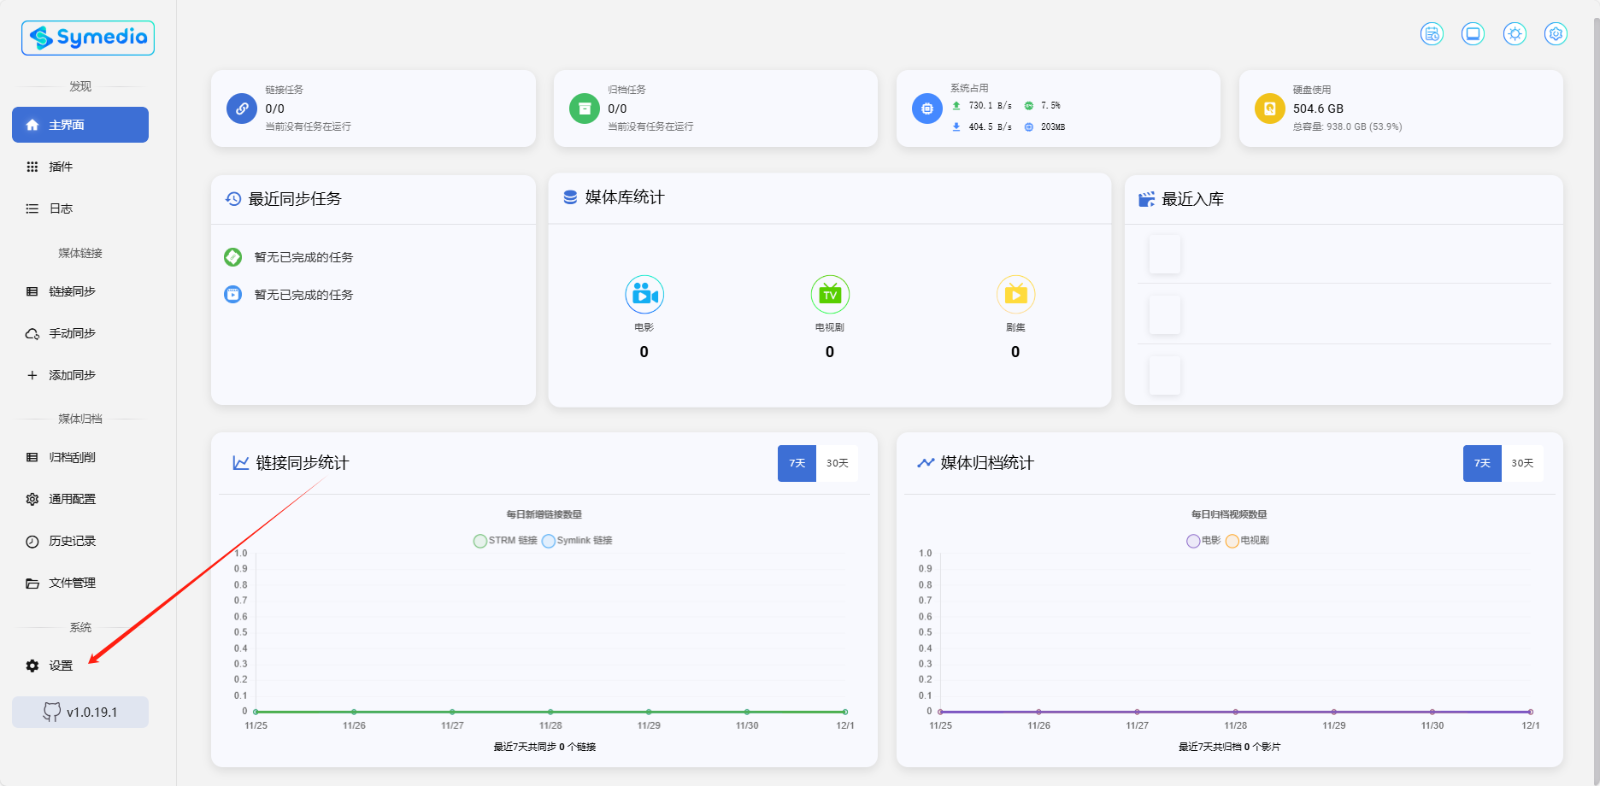
2.1 网页管理
浏览器打开 NAS_IP:8085,就可以访问项目界面了,默认用户名 admin,默认密码 password
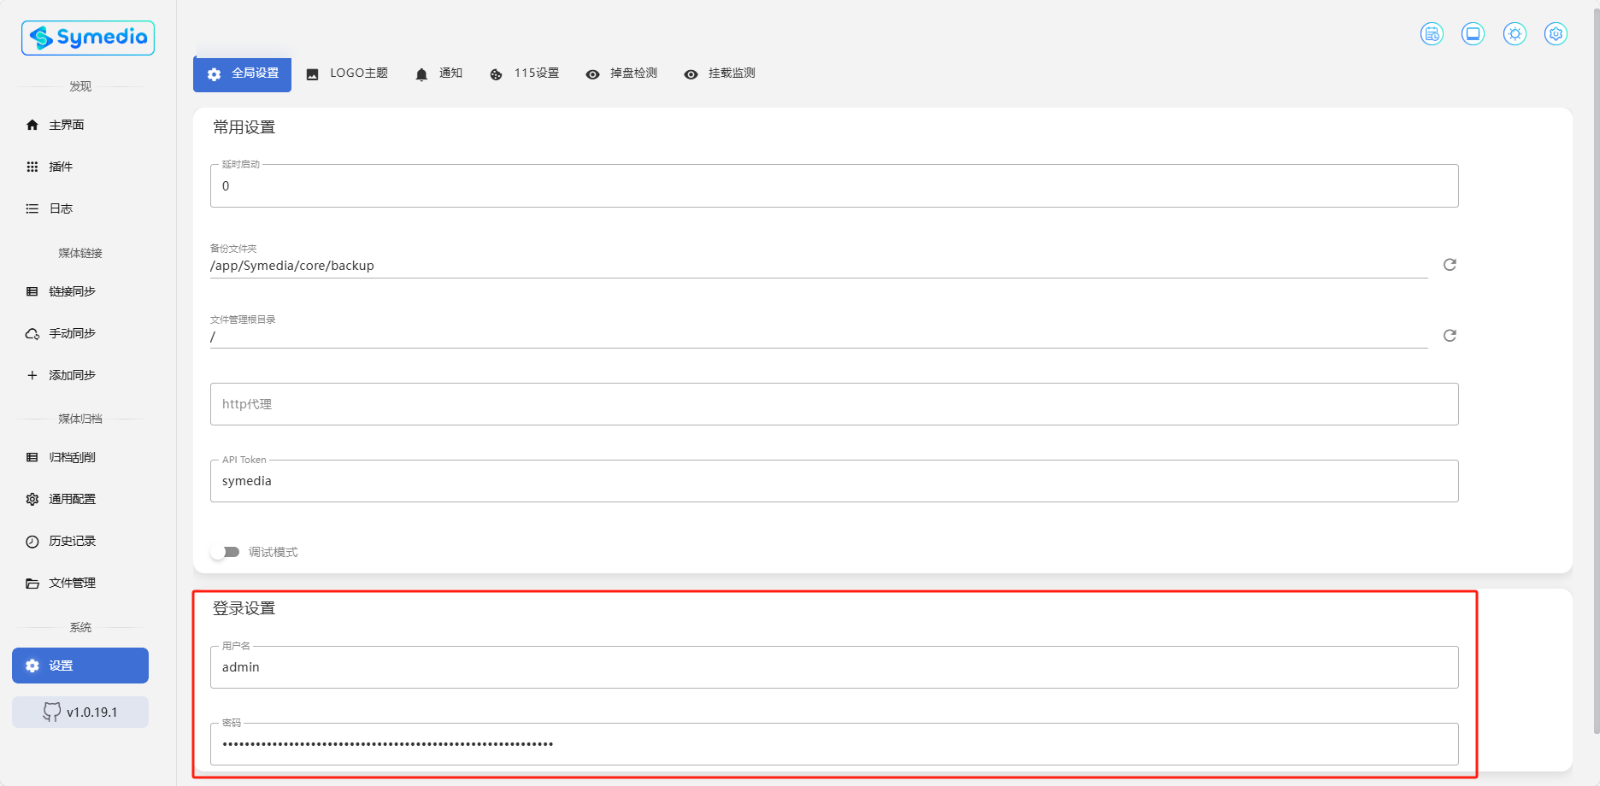
2.2 全局设置:用户名
首次进入设置,全局设置内修改用户名密码,重启生效
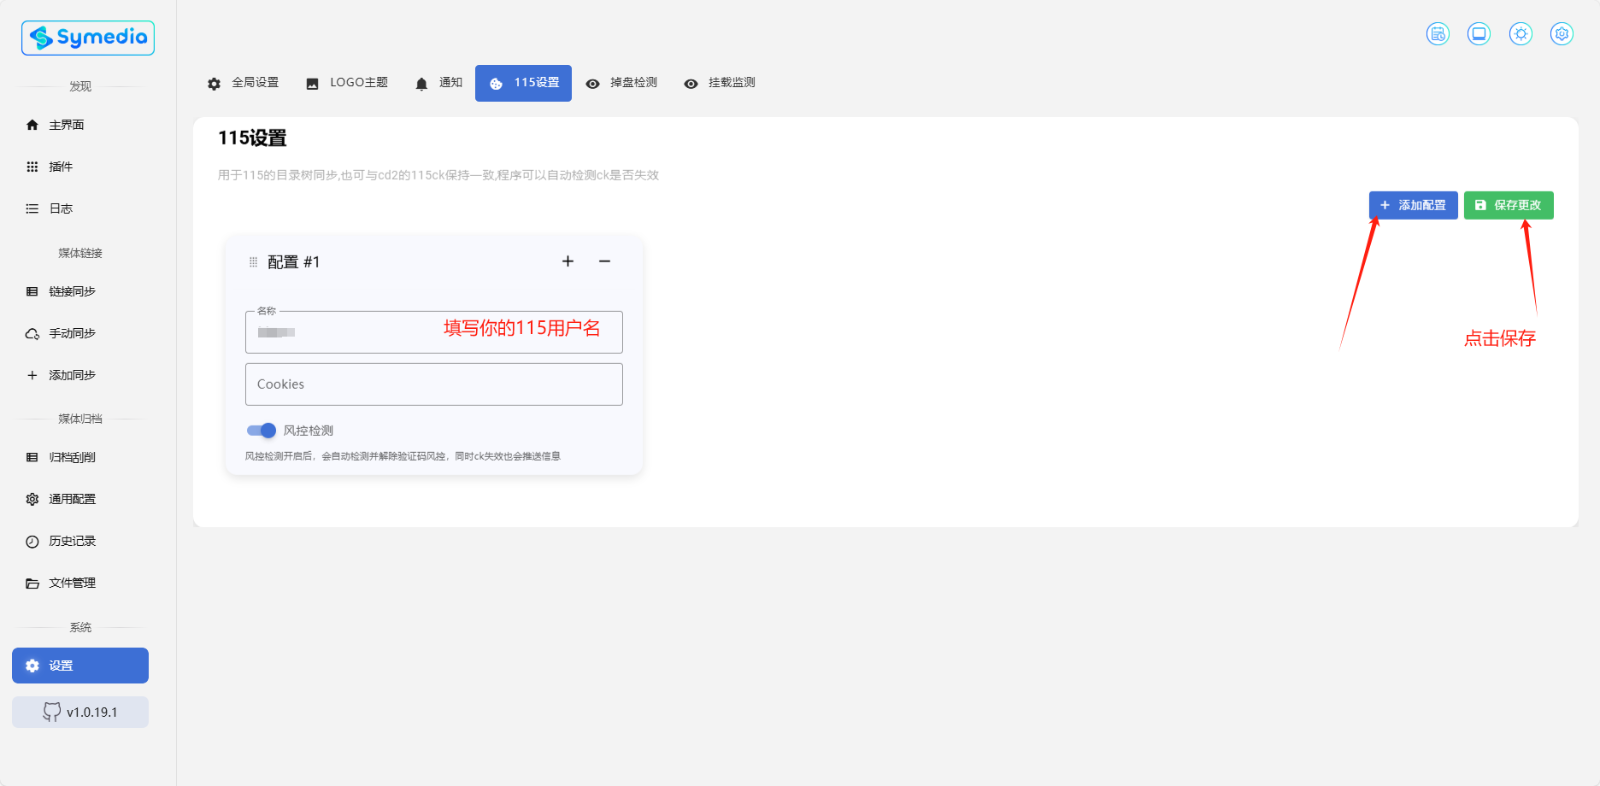
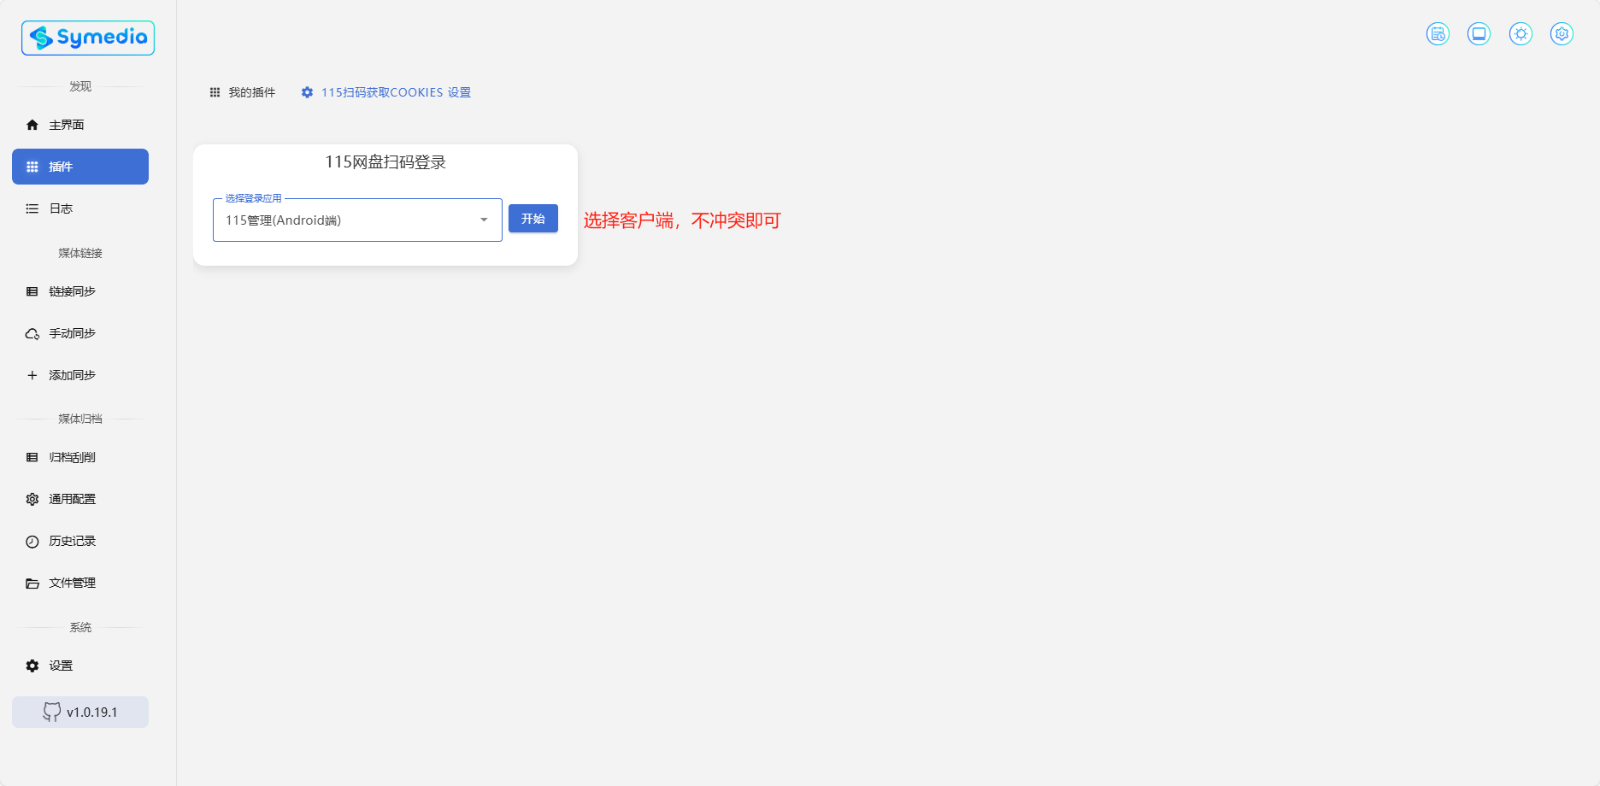
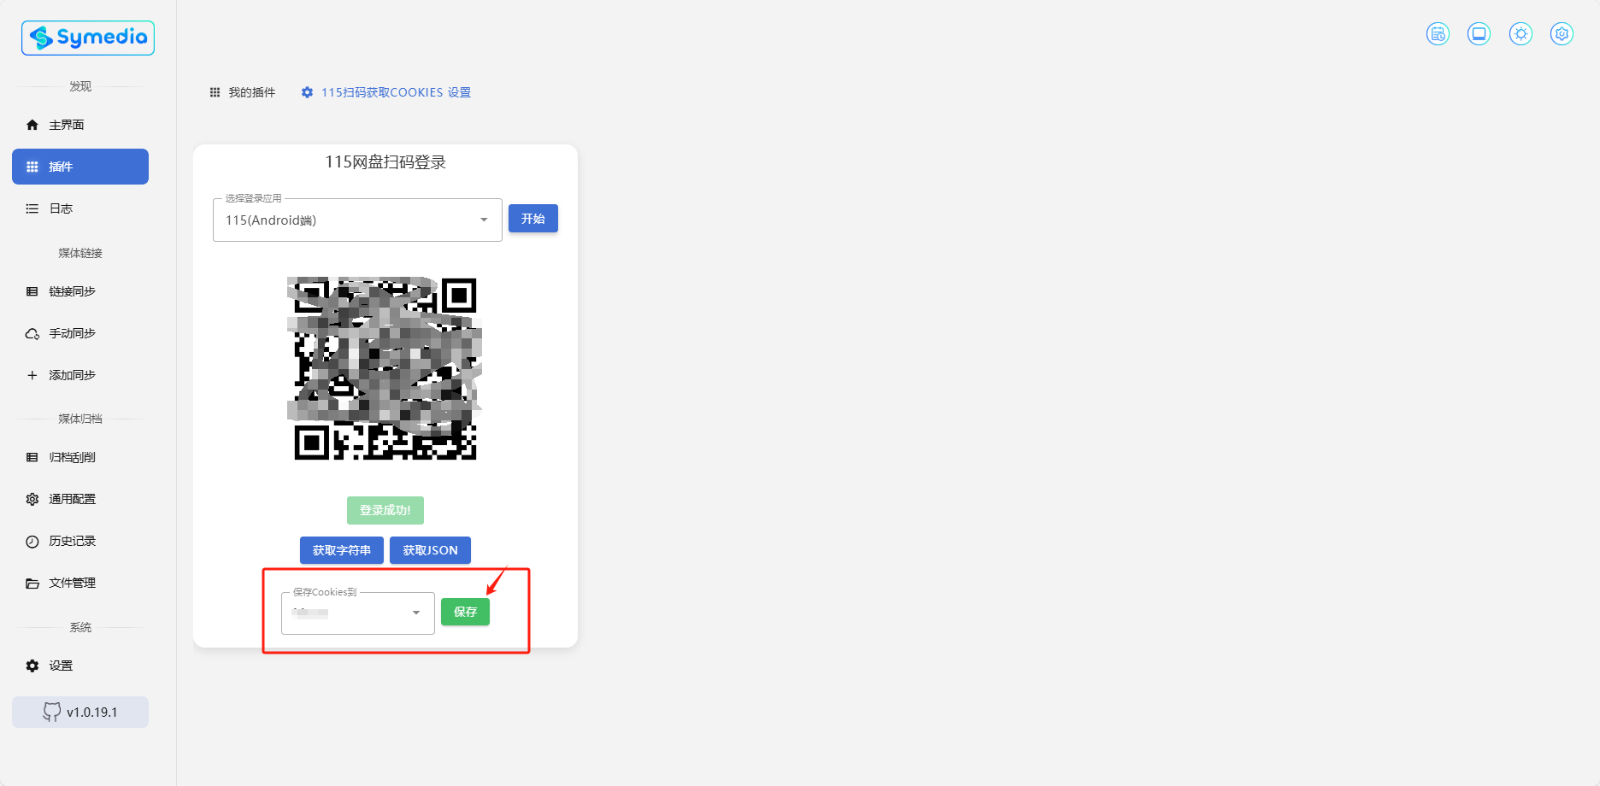
2.3 115 设置
填入名称与 115 cookie,建议抓取微信小程序 cookie,可风控检测(如果使用 FastEmby 后端,可以自动扫码切换 cookie)

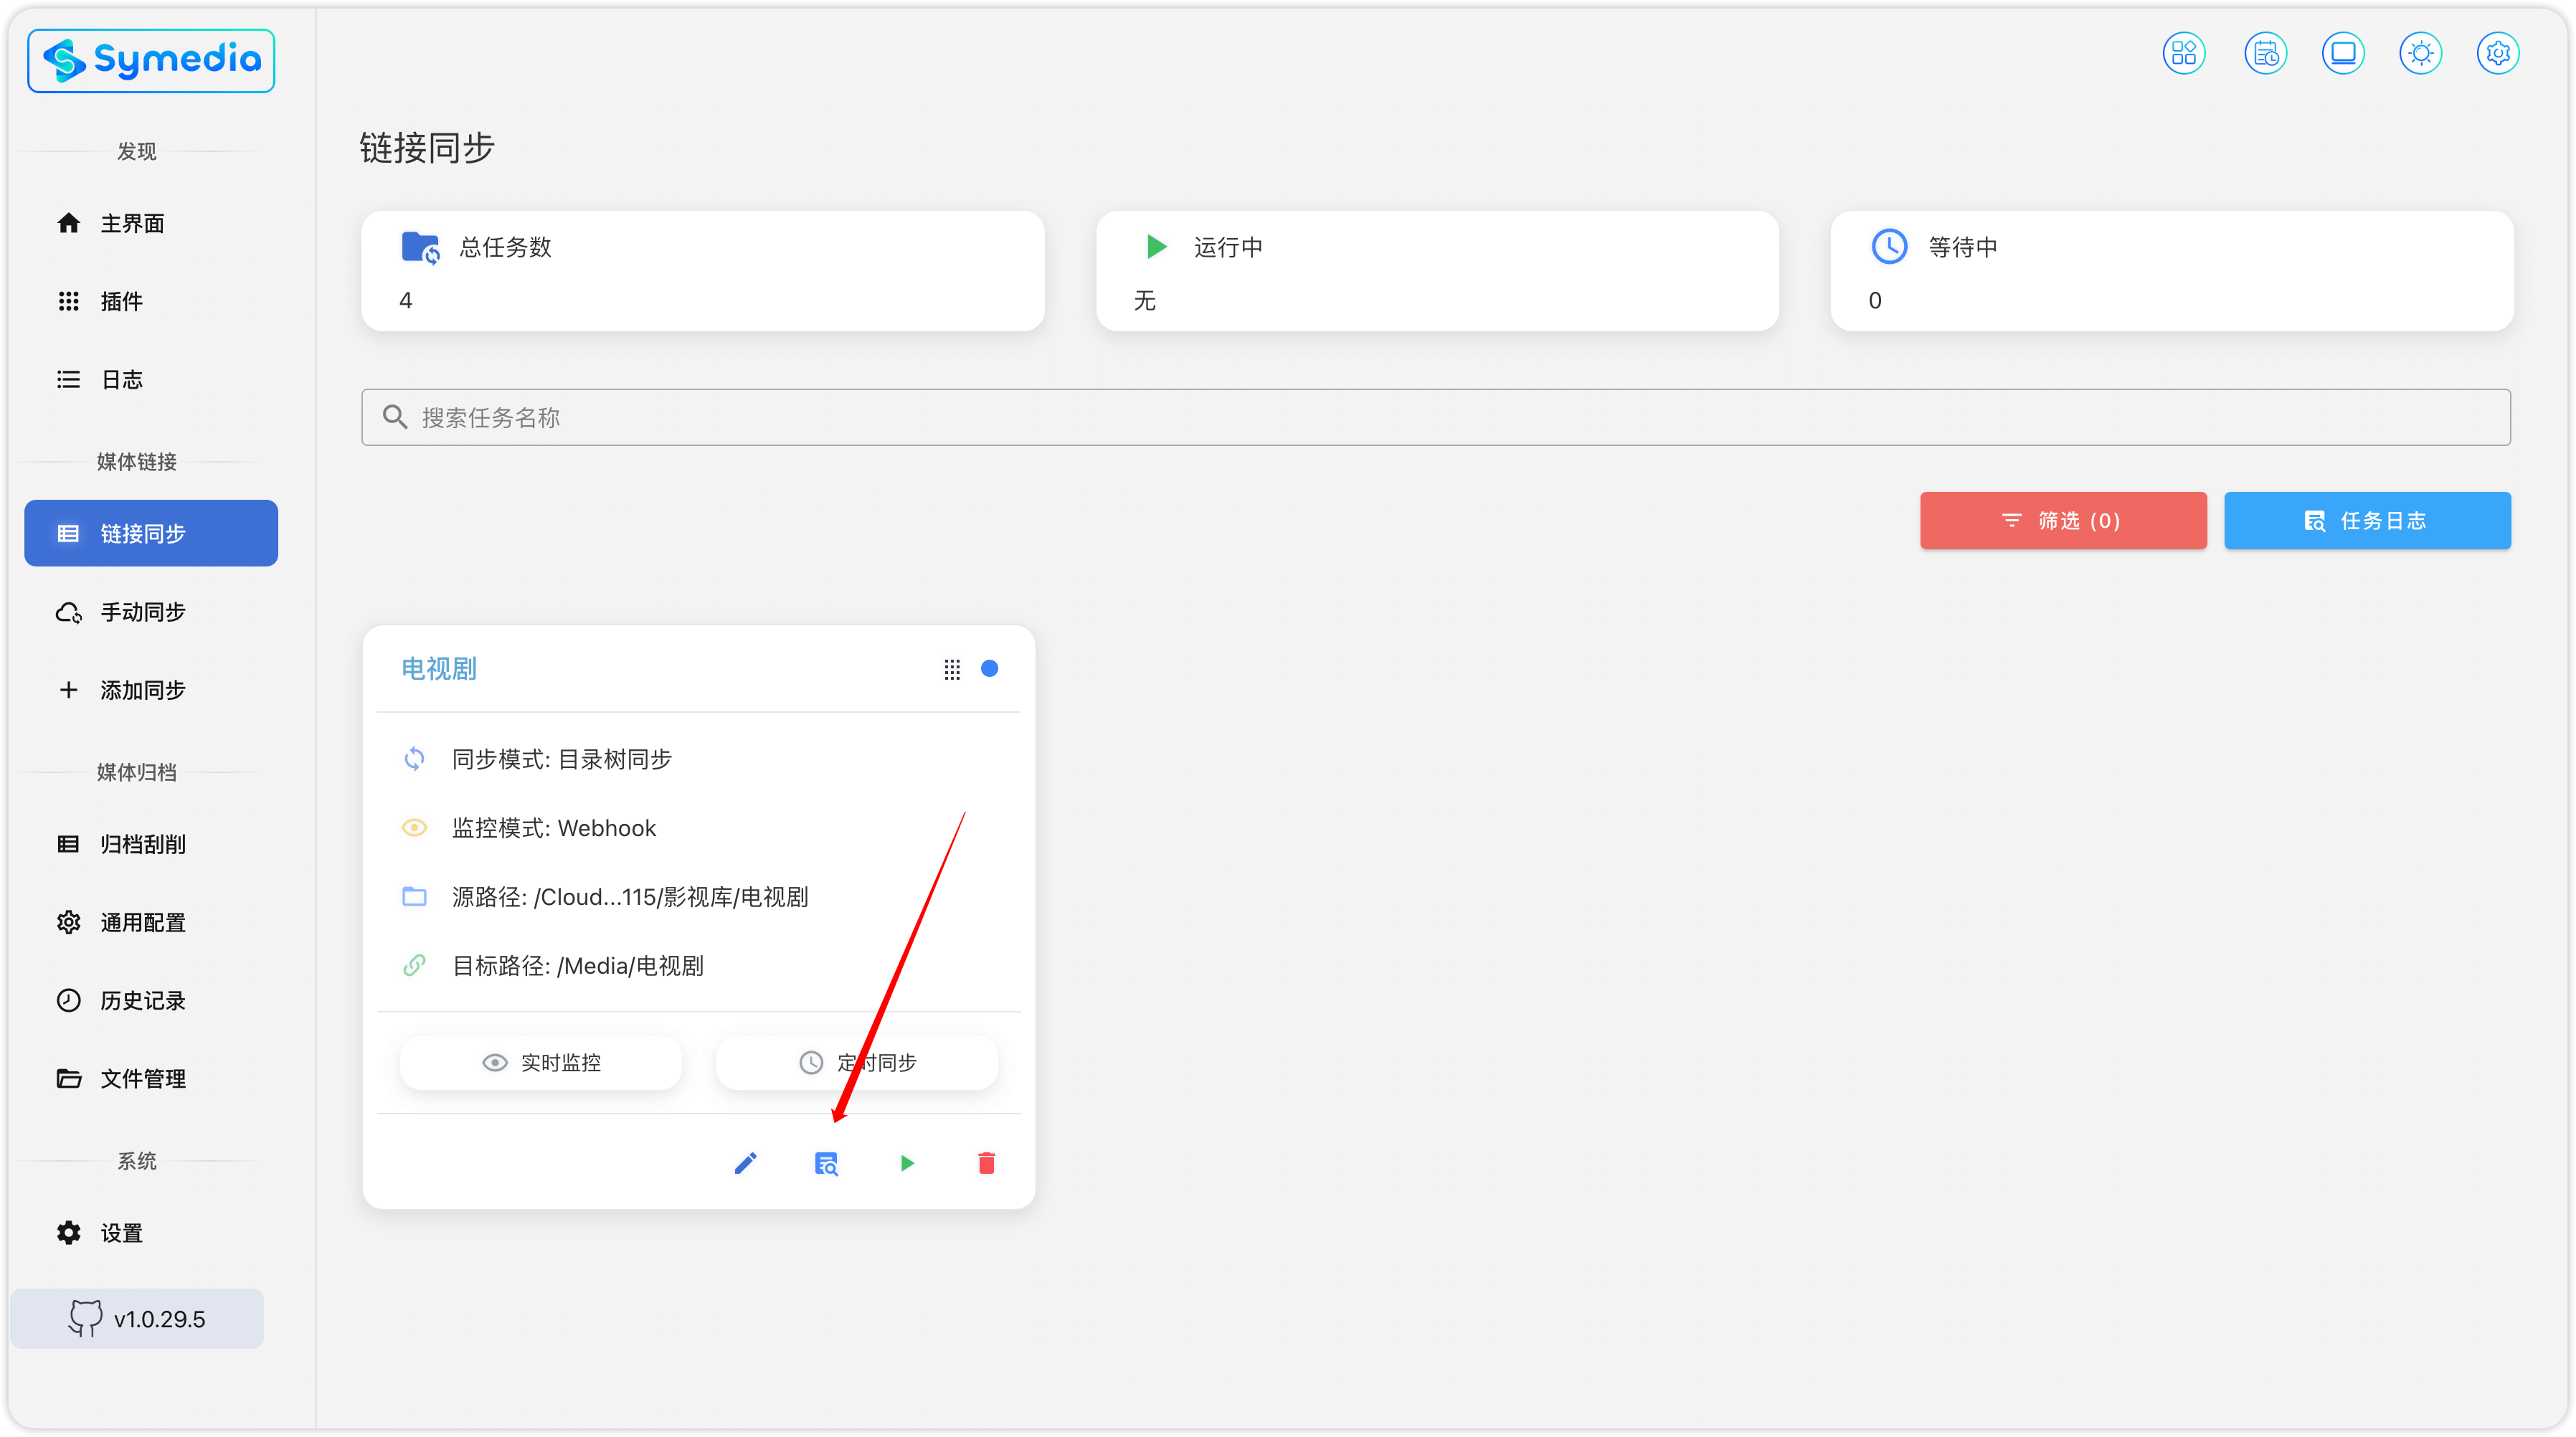
2.4 链接同步
顾名思义,获取网盘中的目录树生成后,在本地目录生成对应的 strm。emby 添加的就是这里的文件
(1). 新建同步,以 "电视剧" 为例:填写任务名称之后,选择同步方式:
- 目录树同步(推荐)
- 星标同步(会使你同步的文件全部打星标,谨慎使用)
- 常规同步(不建议,速度慢容易风控)
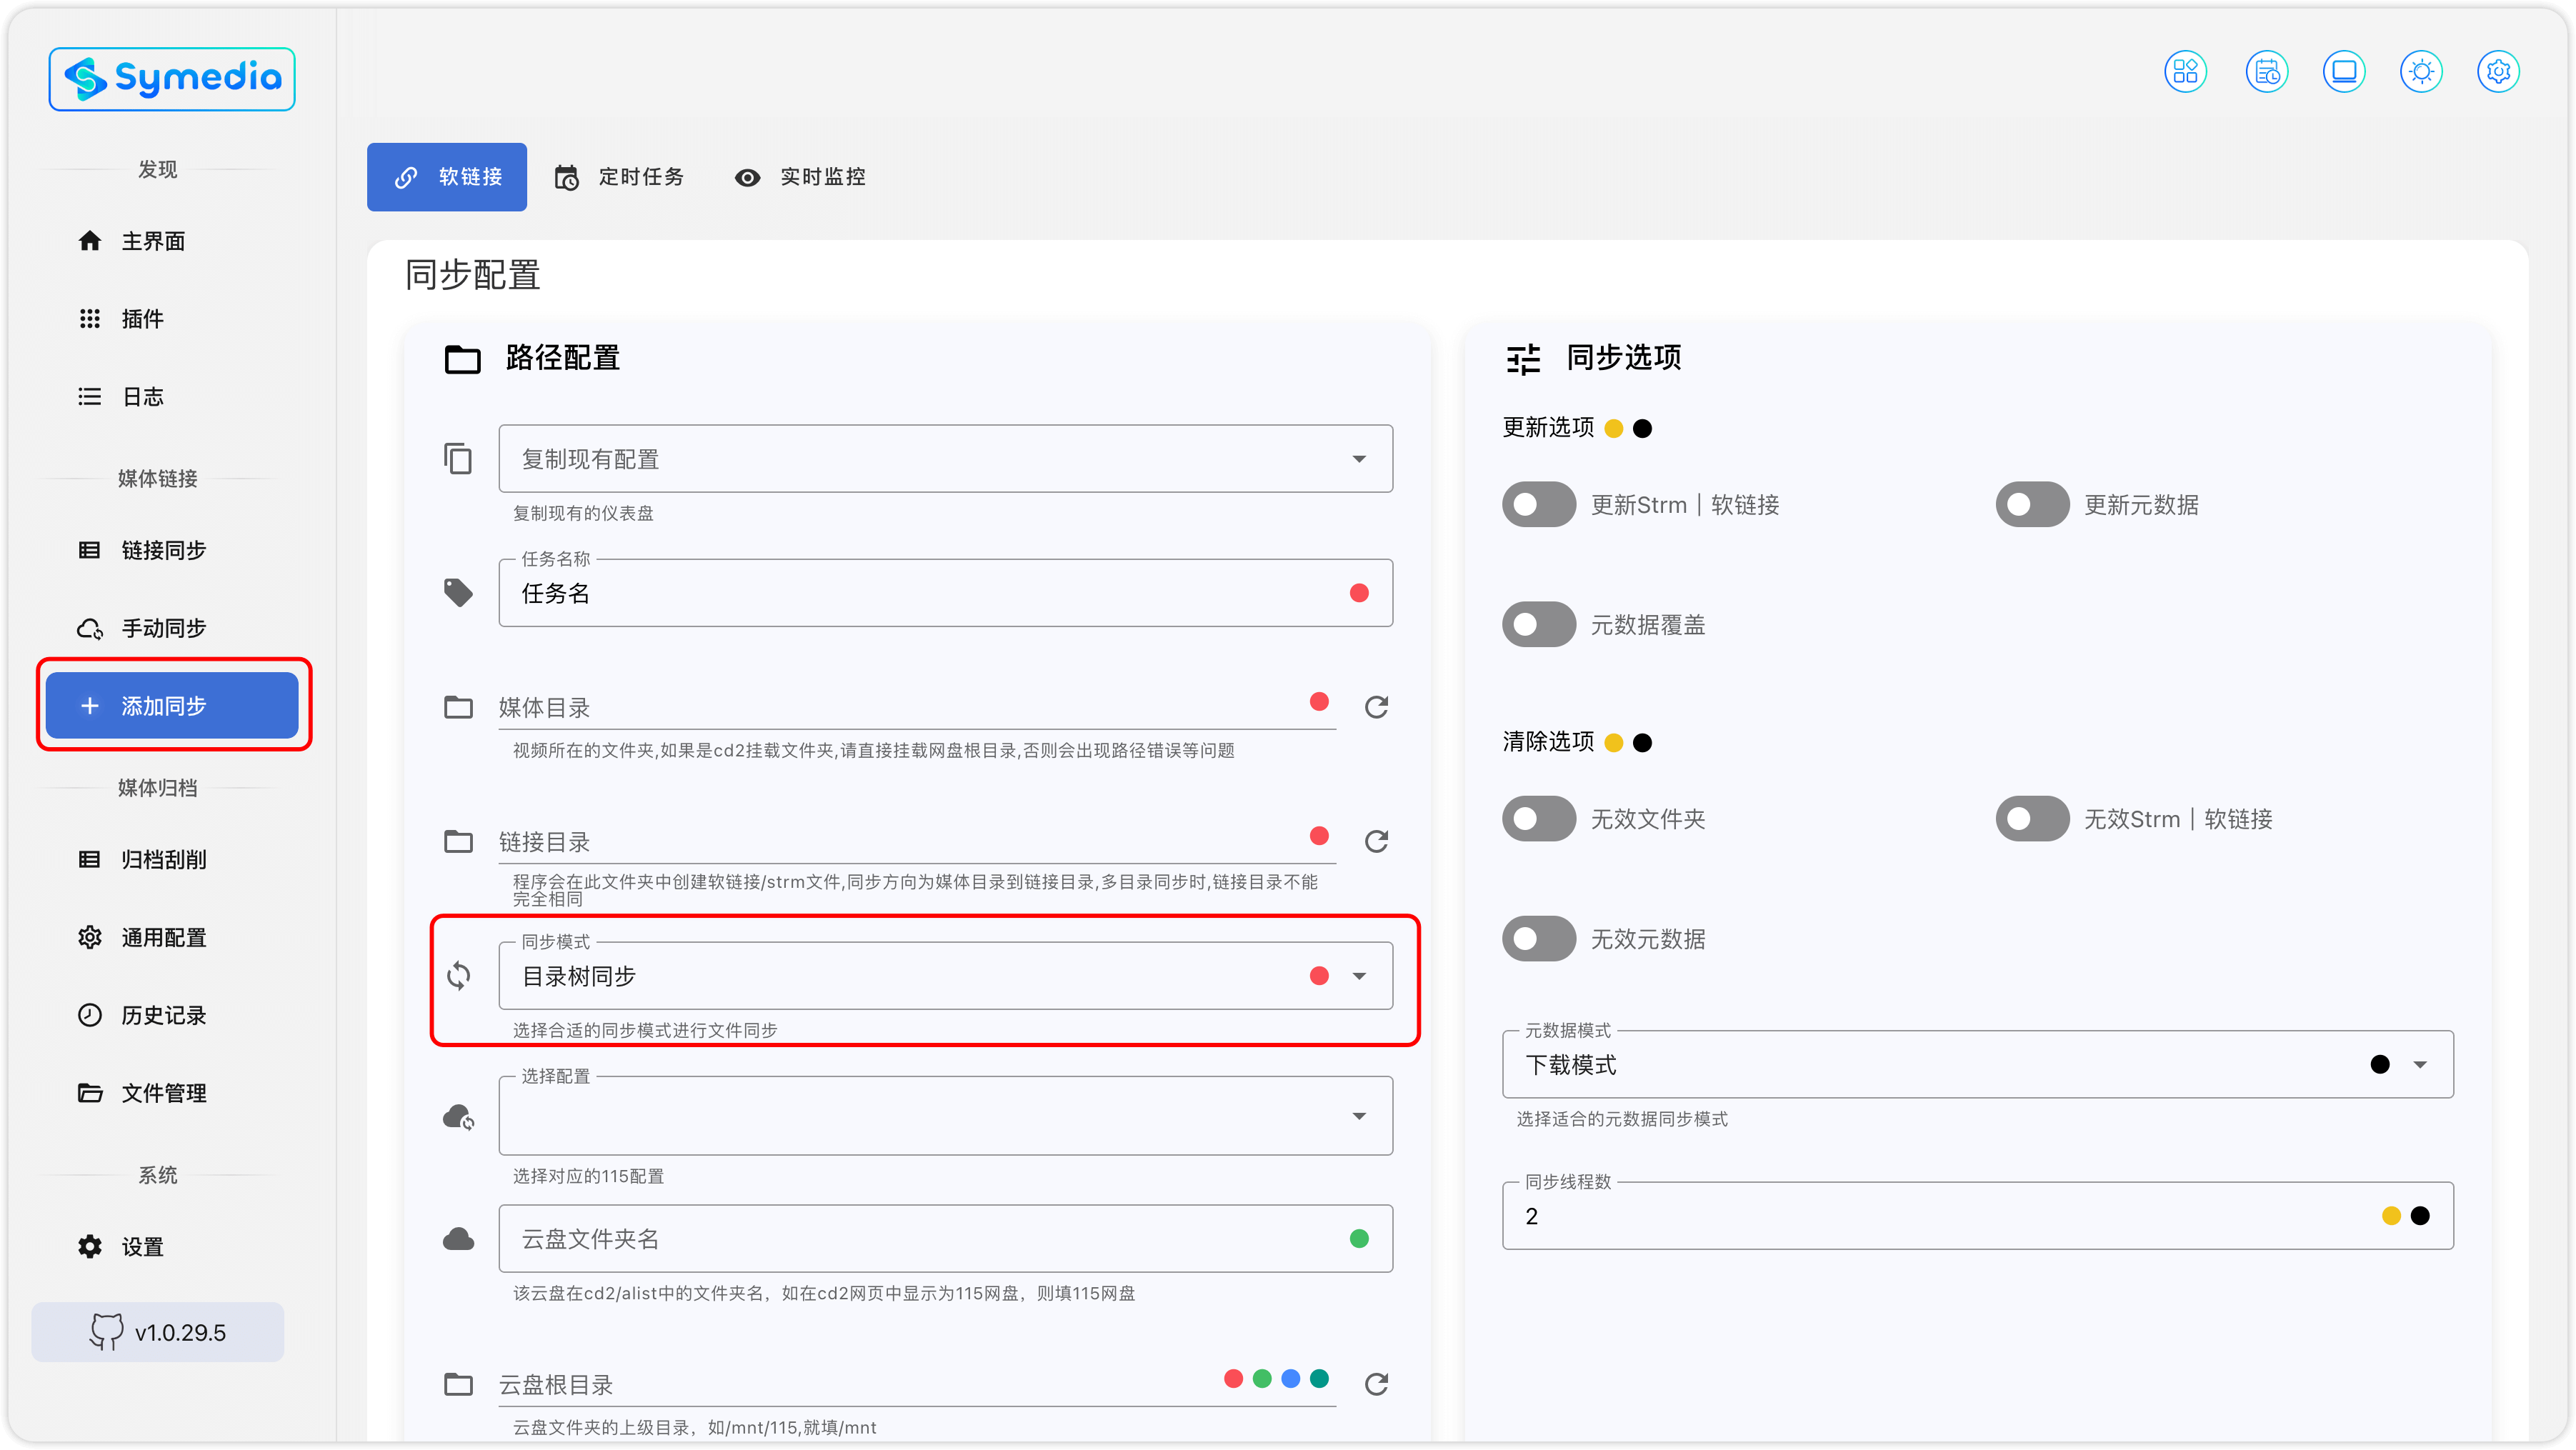
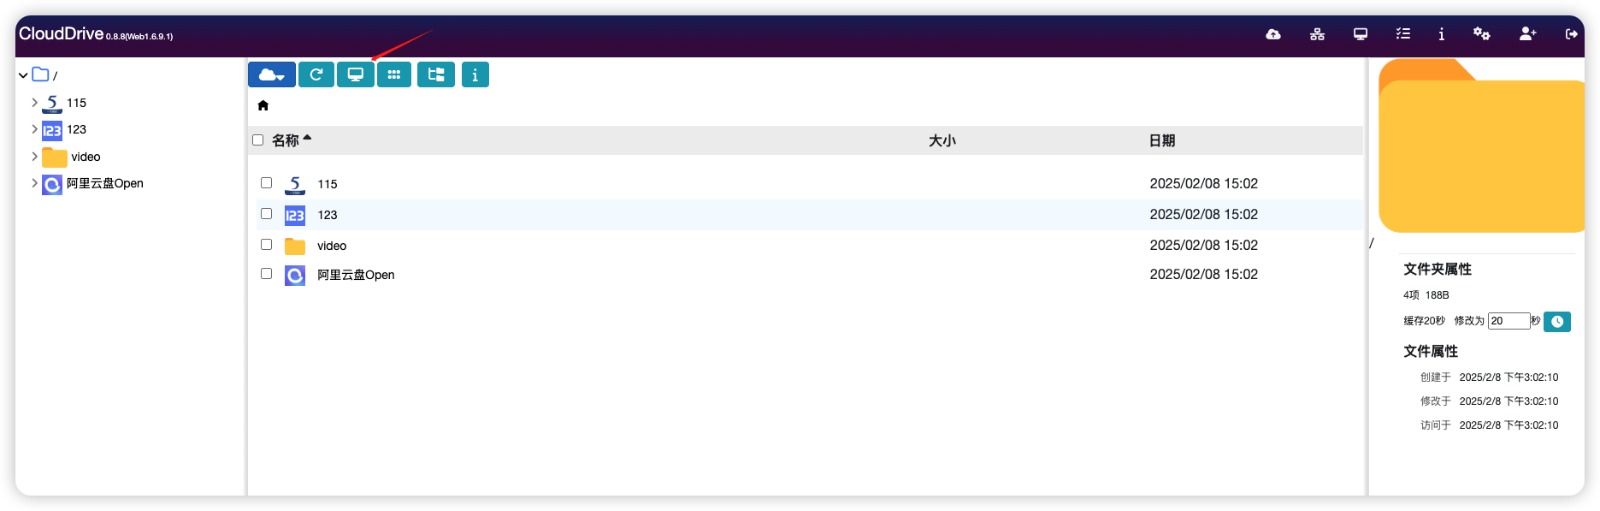
(2). 选择云盘文件夹名字,例如 115(此名字填写在 CD2 网页中,你能看到的那个网盘名字)
如果不懂,看下面的图,对应这里分别要填写:115,123,video,阿里云盘 Open
(3). 选择 115 cookie 配置
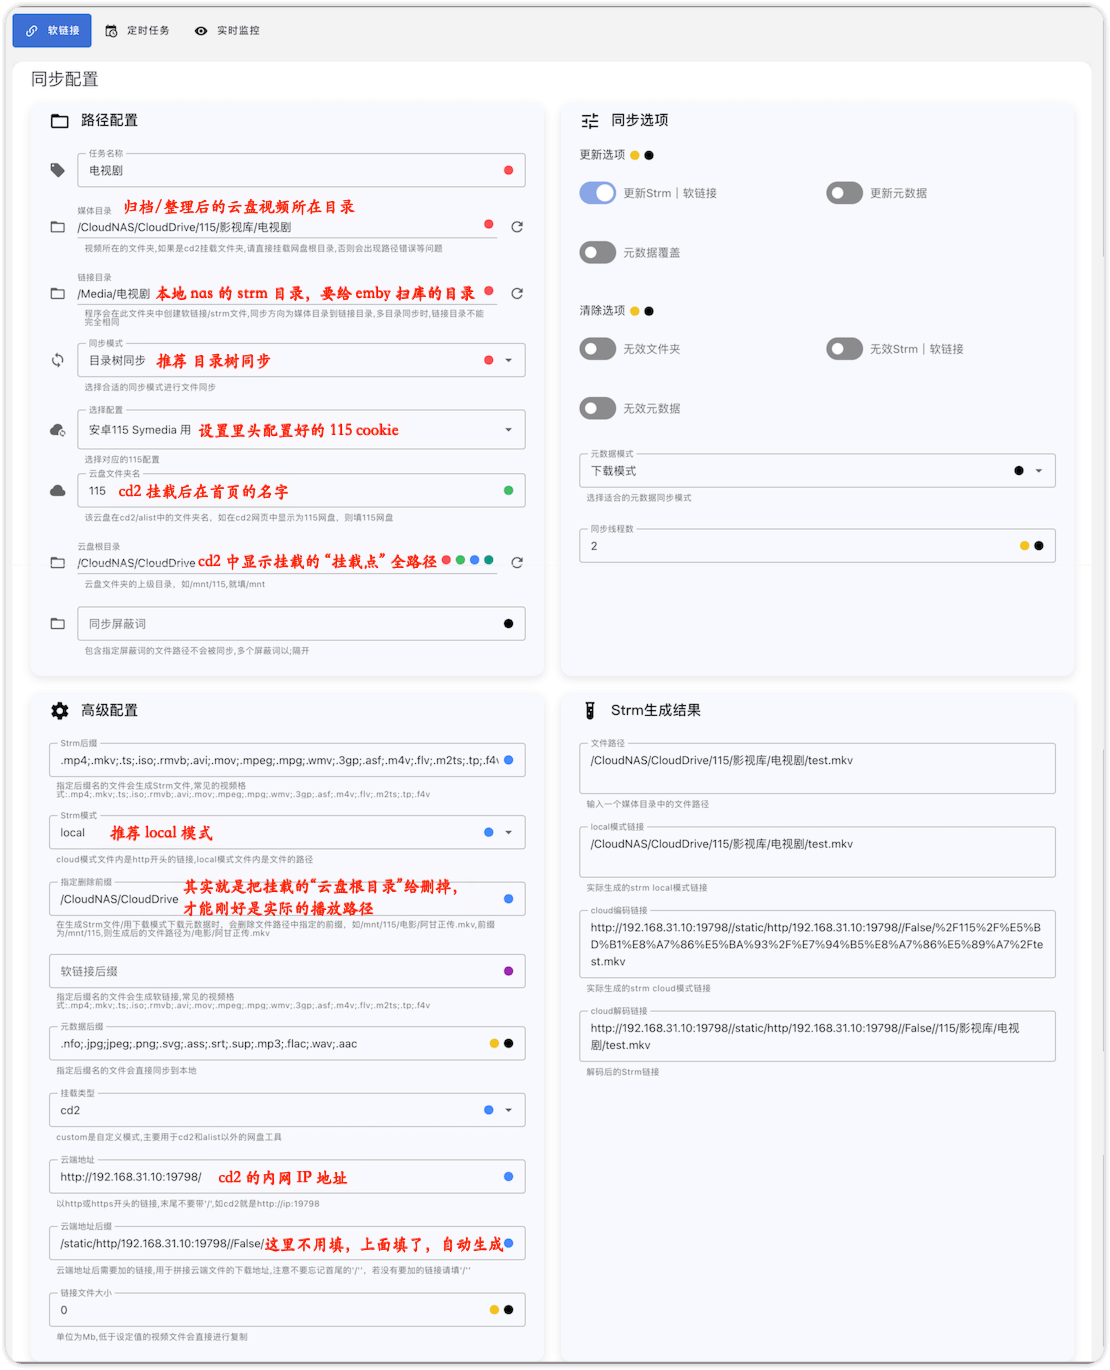
(4). 填写 云盘根目录源目录链接目录等
- 云盘根目录:选择在 CD2 中挂载点的名称,网盘路径是根路径
- 源目录(新版本改成了媒体目录):选择需要生成 strm 的视频,在网盘中的位置
- 链接目录:本地 nas 中的存放 strm 的位置
(5). 选择挂载类型,可选 cd2、alist、custom(自行配置,fastemby 用户可选)
(6). 以 cd2 为例,填写远端地址,strm 模式(软链接或 strm),及其它。右侧实时更新 strm 预览结果,可对照使用。
(7). 填写本地需要生成的 strm、软链接及元数据后缀,区别于 autosumlink,sa 可以同时生成 strm 或软链接。
(8). 侧边栏手动同步,可以复制本地已有的配置,省去反复重新填写的麻烦
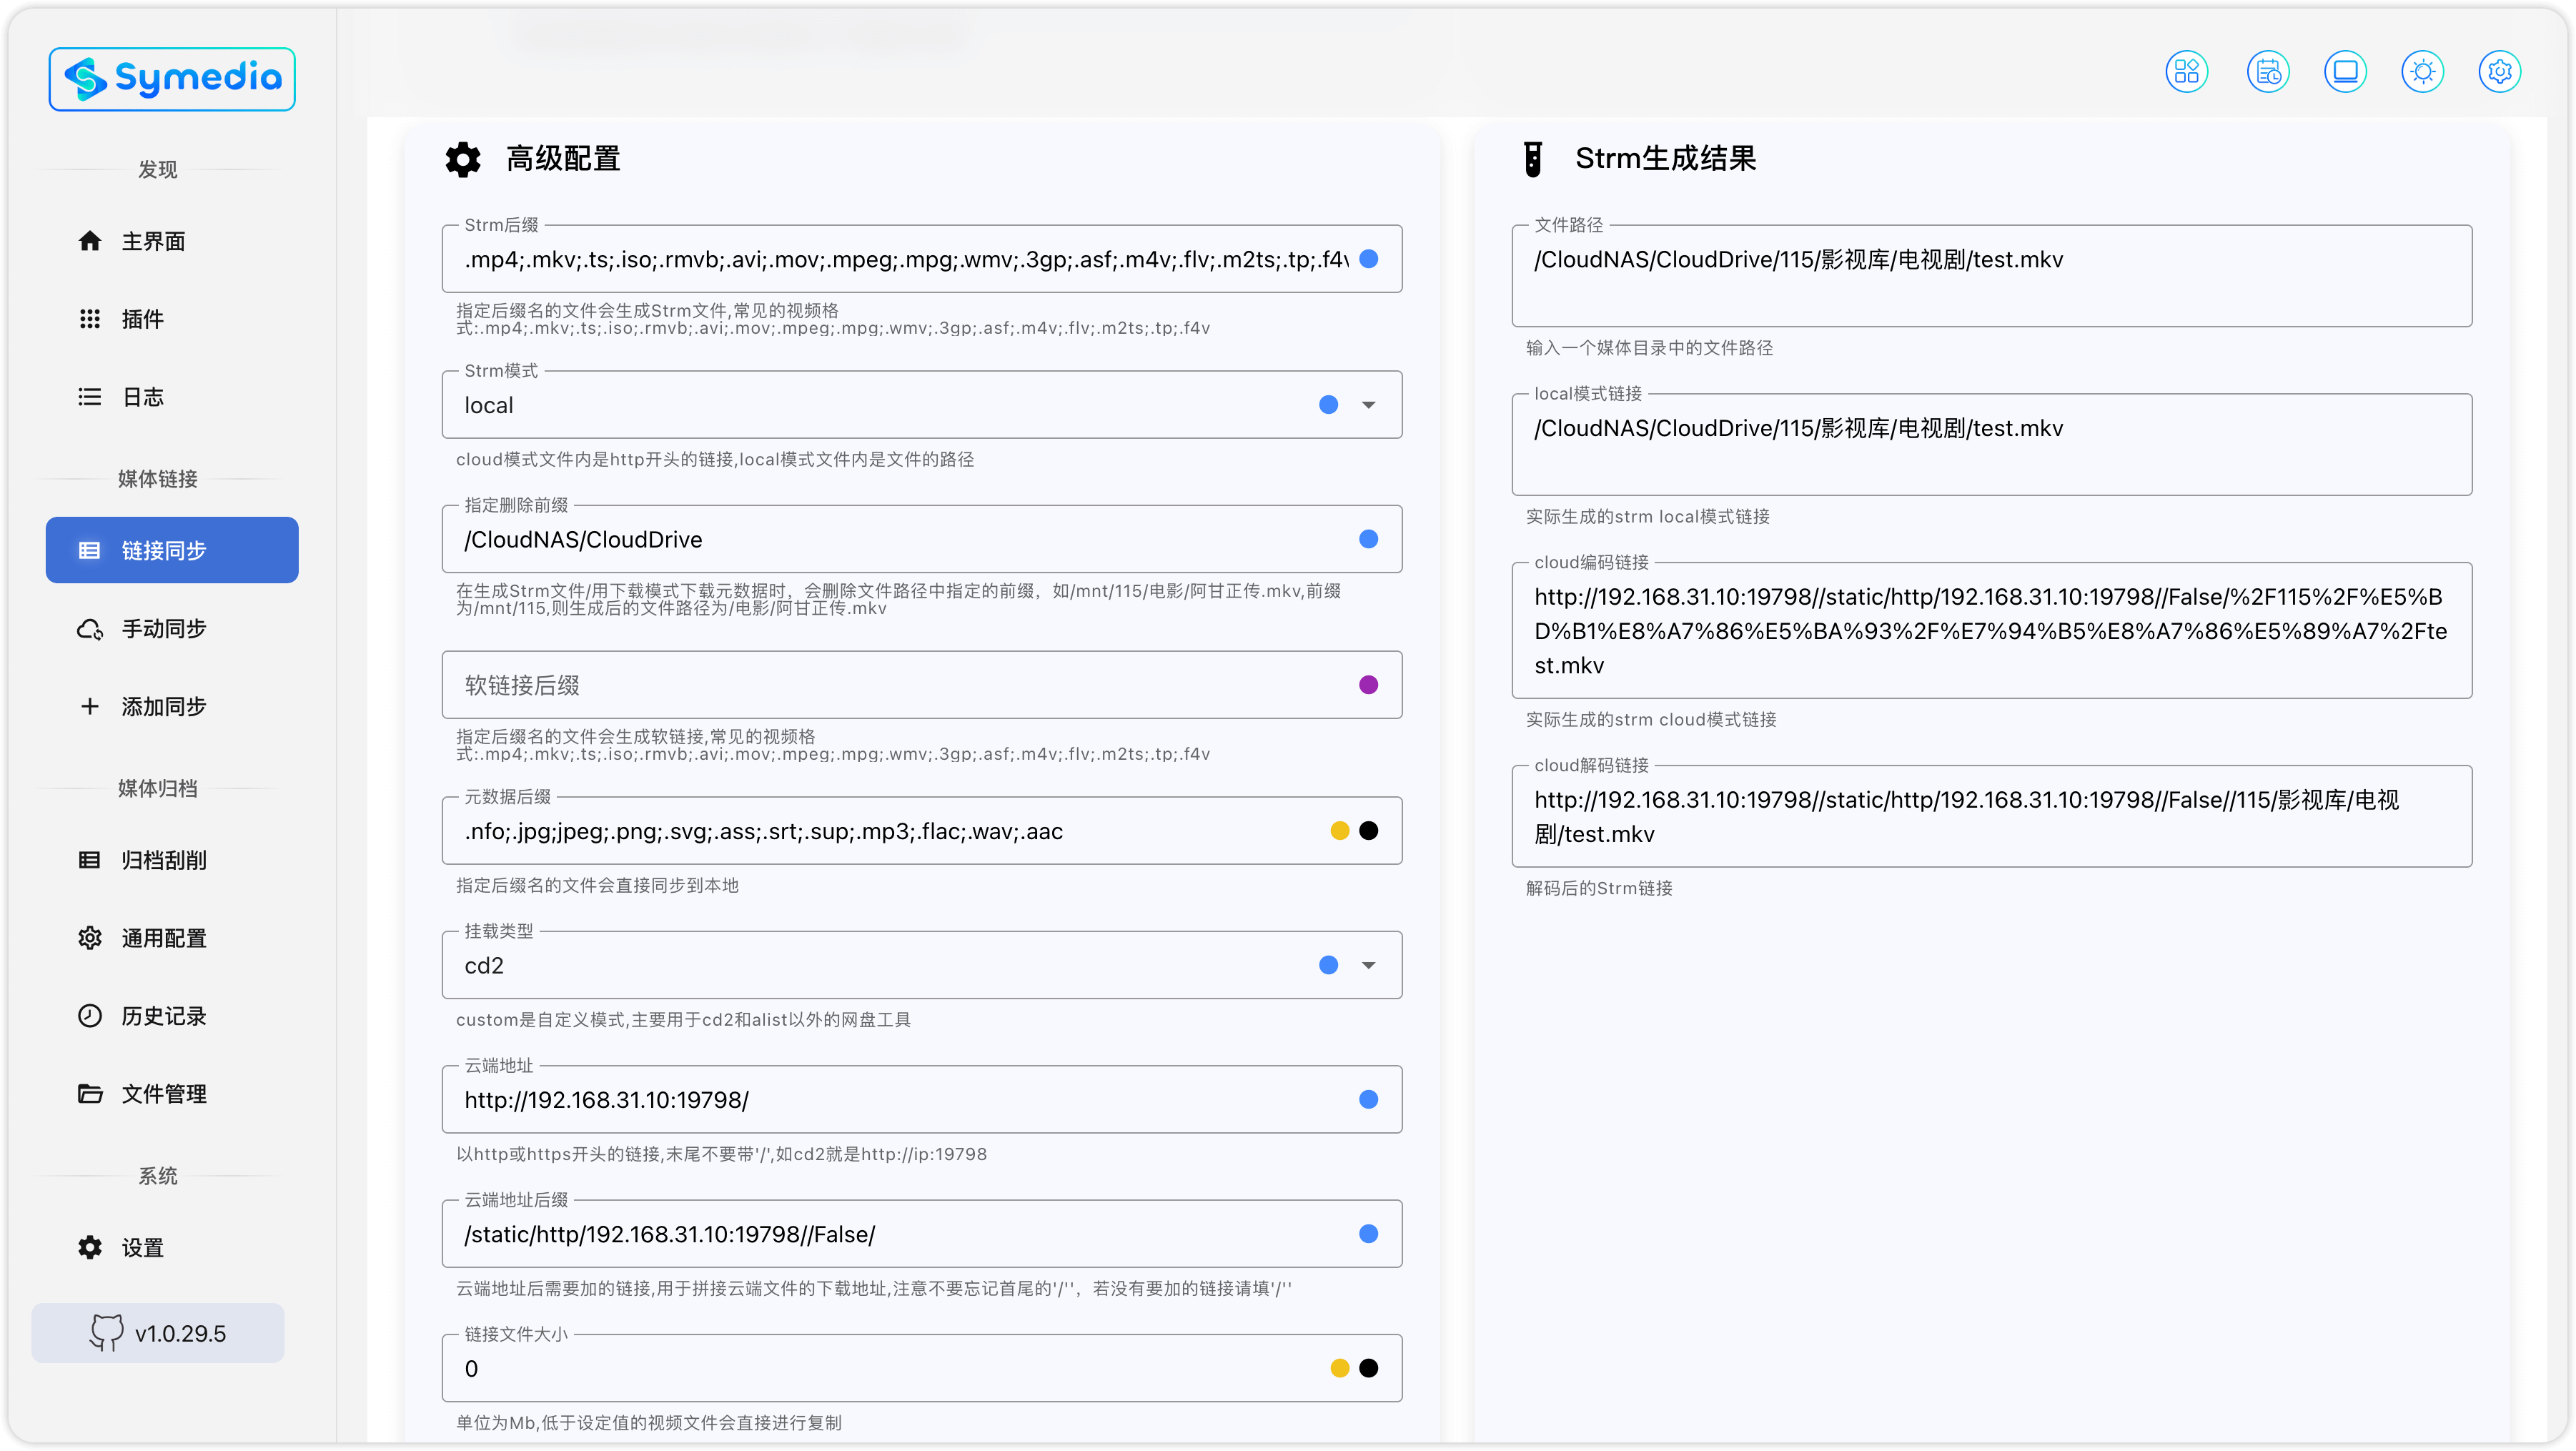
(9). 高级配置:
Strm 模式:
cloud模式文件内是 http 开头的链接local模式文件内是 文件的路径
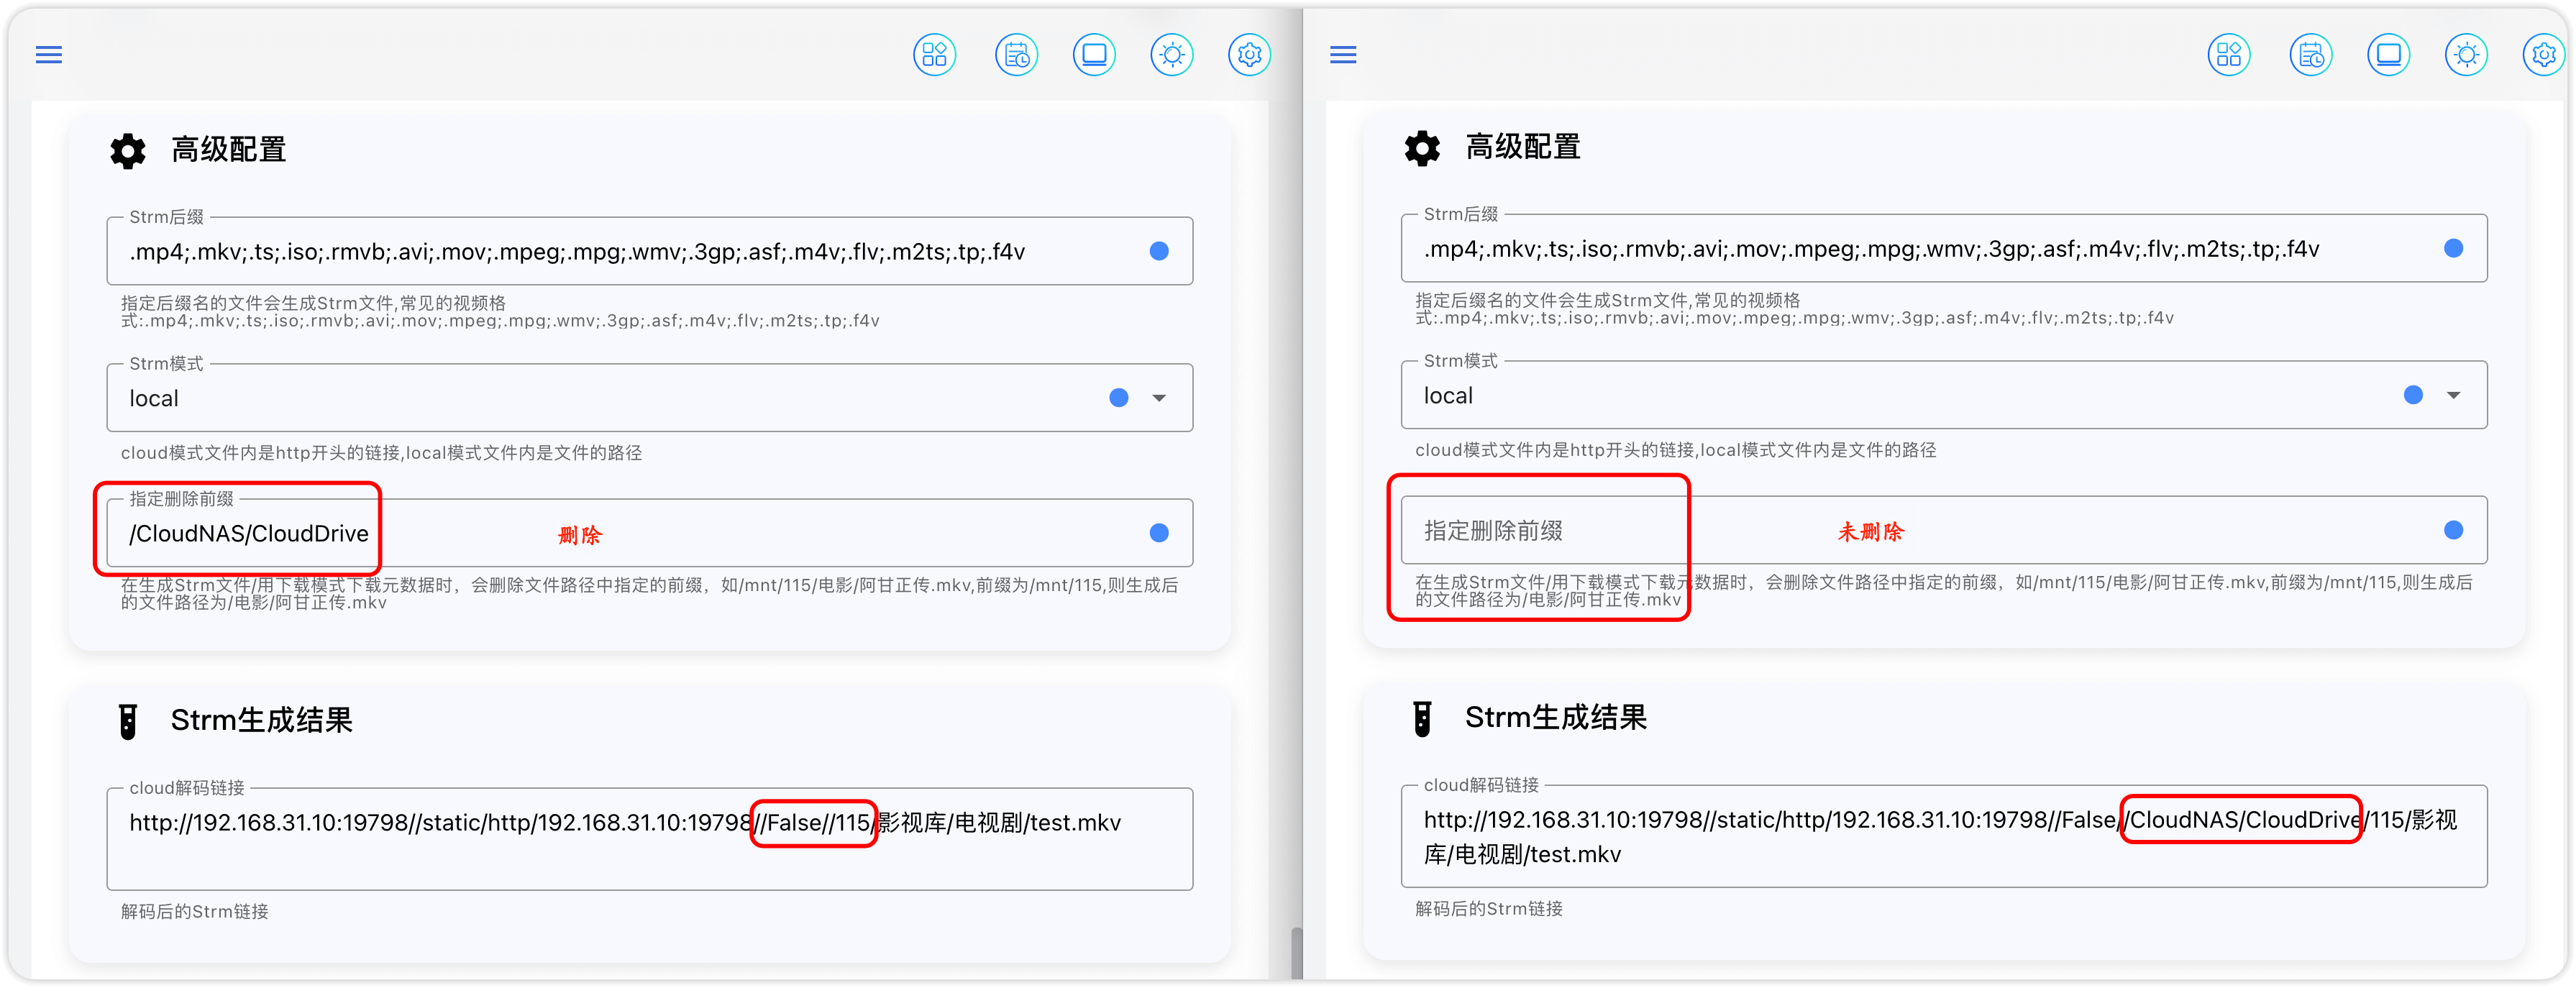
注意: 要删除指定前缀才能成功播放
例如:我这里的实际解码路径为:
http://192.168.31.10:19798//static/http/192.168.31.10:19798//False//CloudNAS/CloudDrive/115/影视库/电视剧/test.mkv
在 cd2 中查看我路径实际为
http://192.168.6181:19798/static/http/192.168.6.181:19798/False//CloudNAS/CloudDrive/115
/CloudNAS/CloudDrive 为多余的,删掉即可
然后运行试试,可以看到生成的速度很快
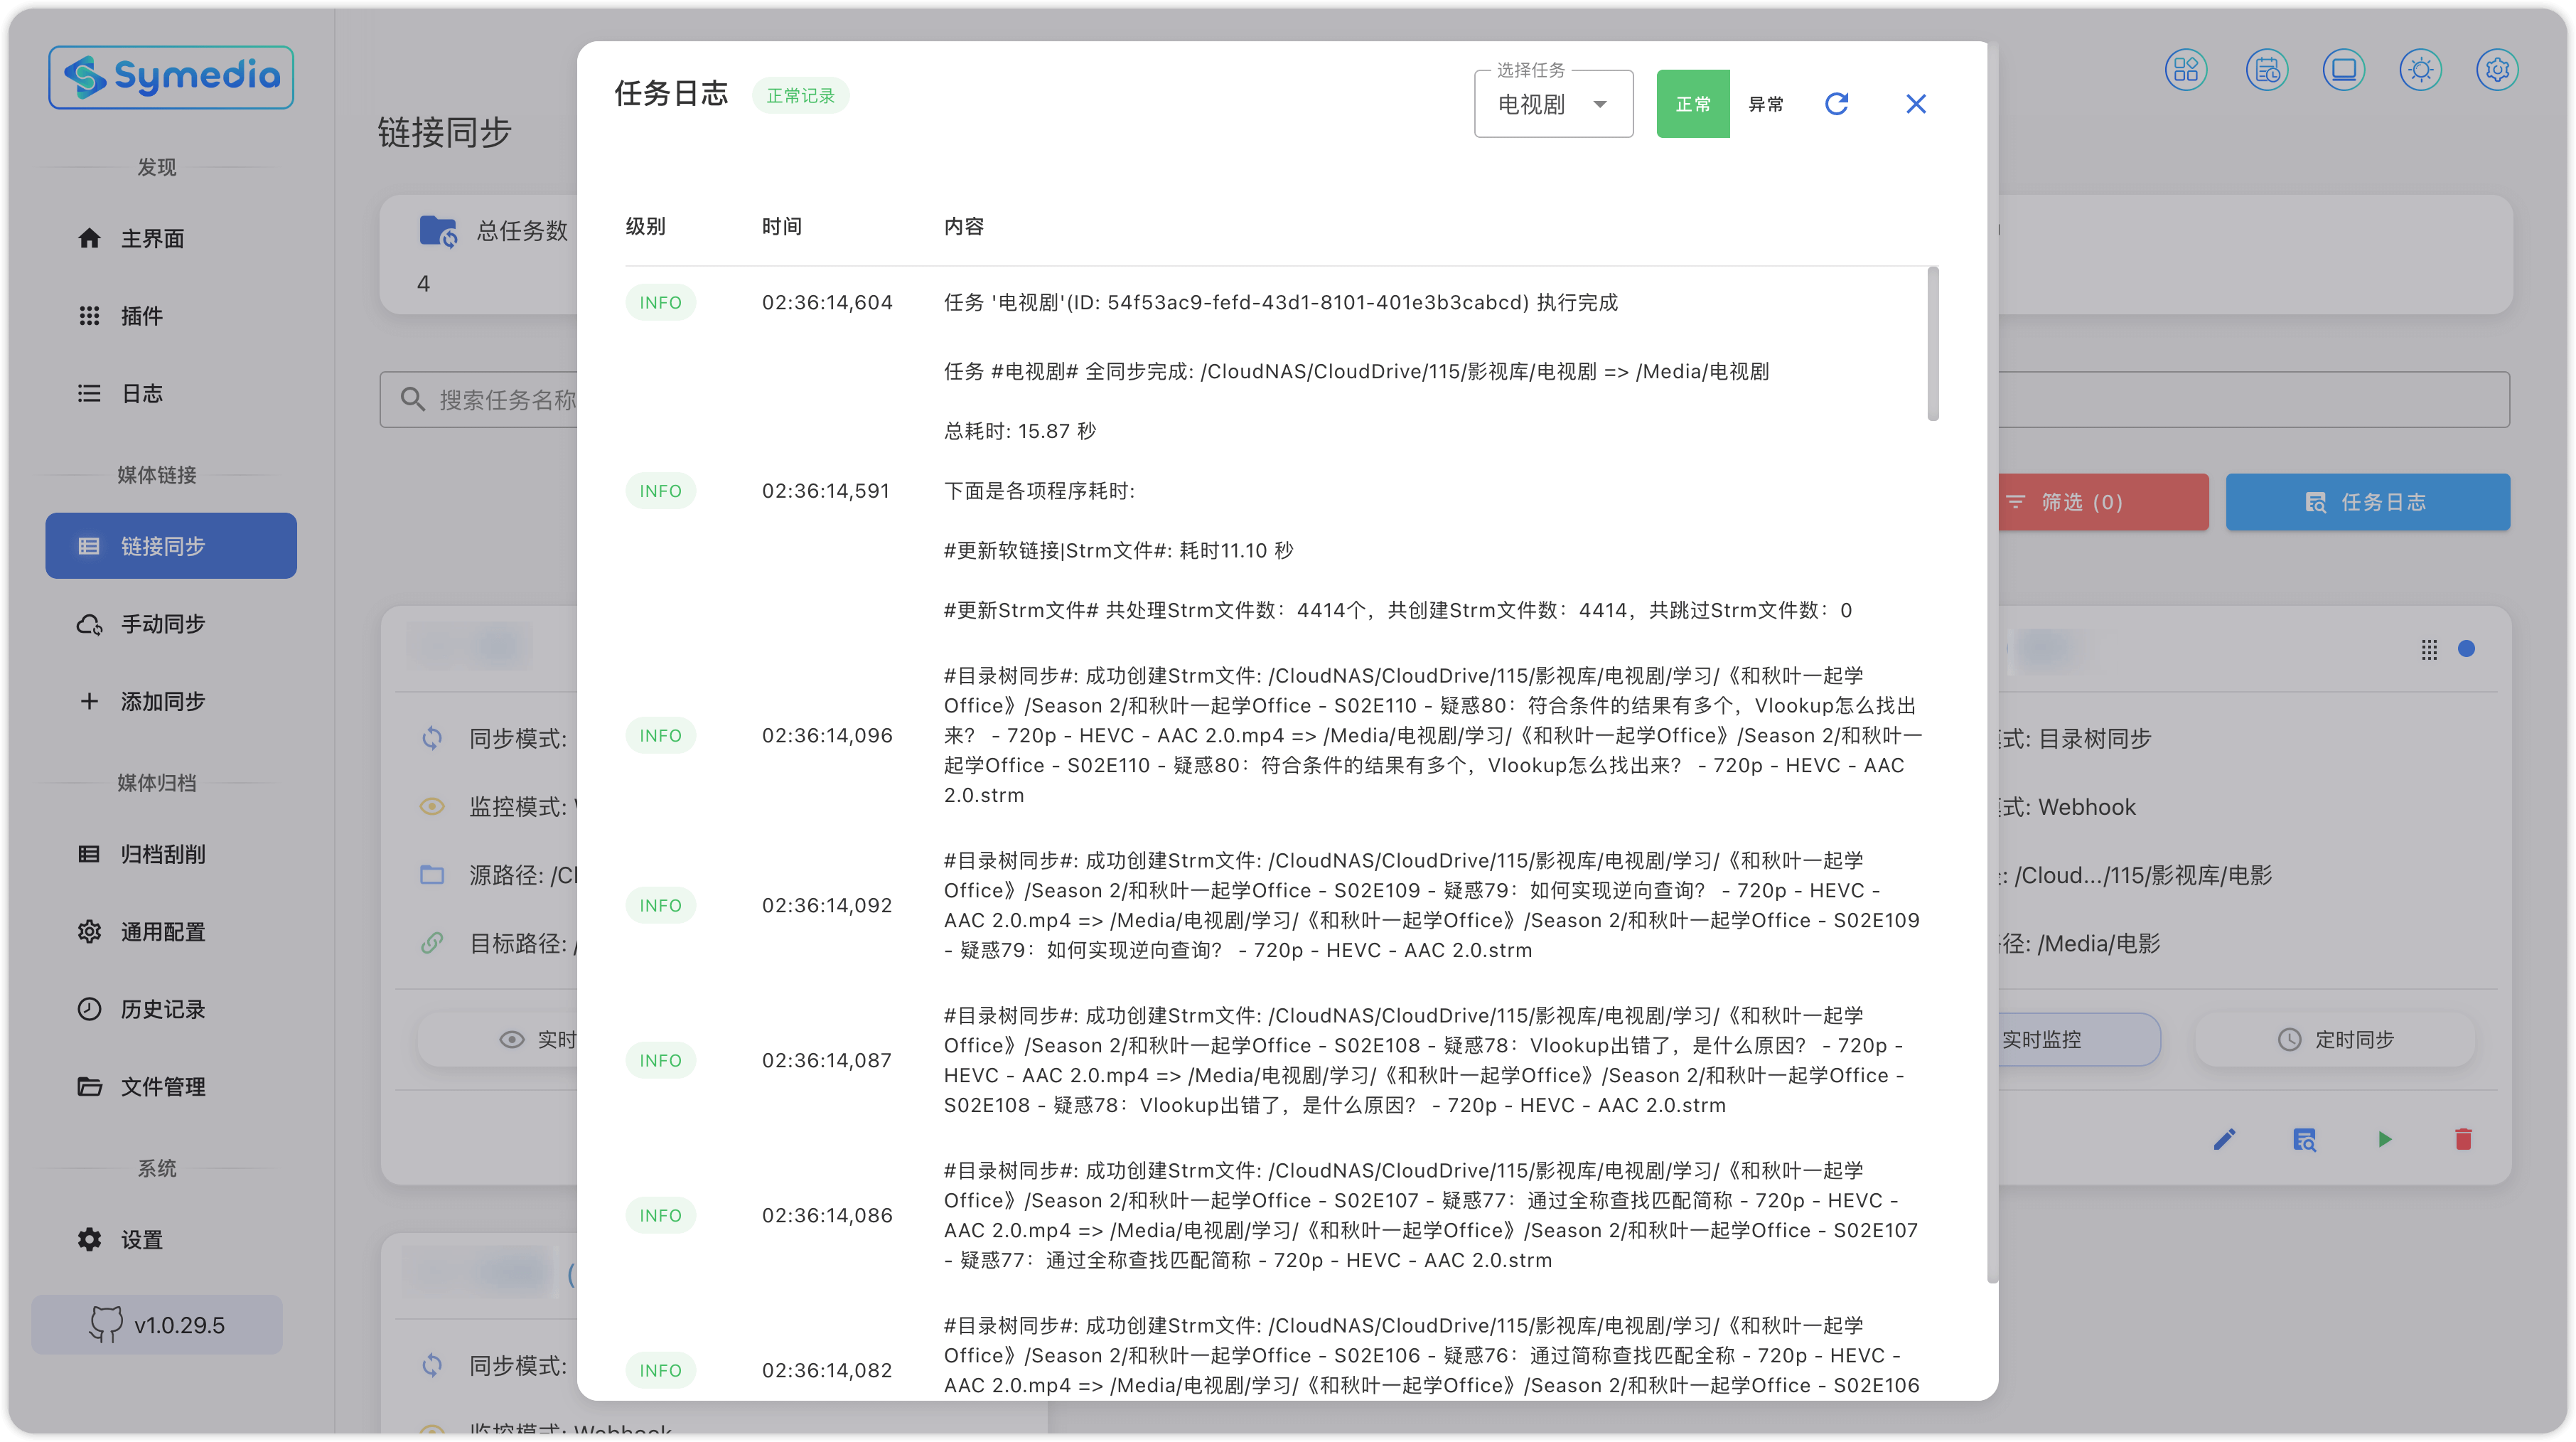
作者很贴心,单独给同步的链接做了日志,新增删除都有记录,很细
上面例子配置完后,大概就是下面这样:
2.5 通知
- Telegram 机器人通知
tg 寻找机器人 father @BotFather 创建属于自己的机器人,获取 bot tokon,填入自己的 tg ID 以接收 sa 通知或互动。
- 企业微信通知
版权声明:本文为「HuanHQ」的原创文章,转载请附上原文出处链接及本声明
设置教程网址链接:
https://www.huanhq.com/archives/Symedia-plugins
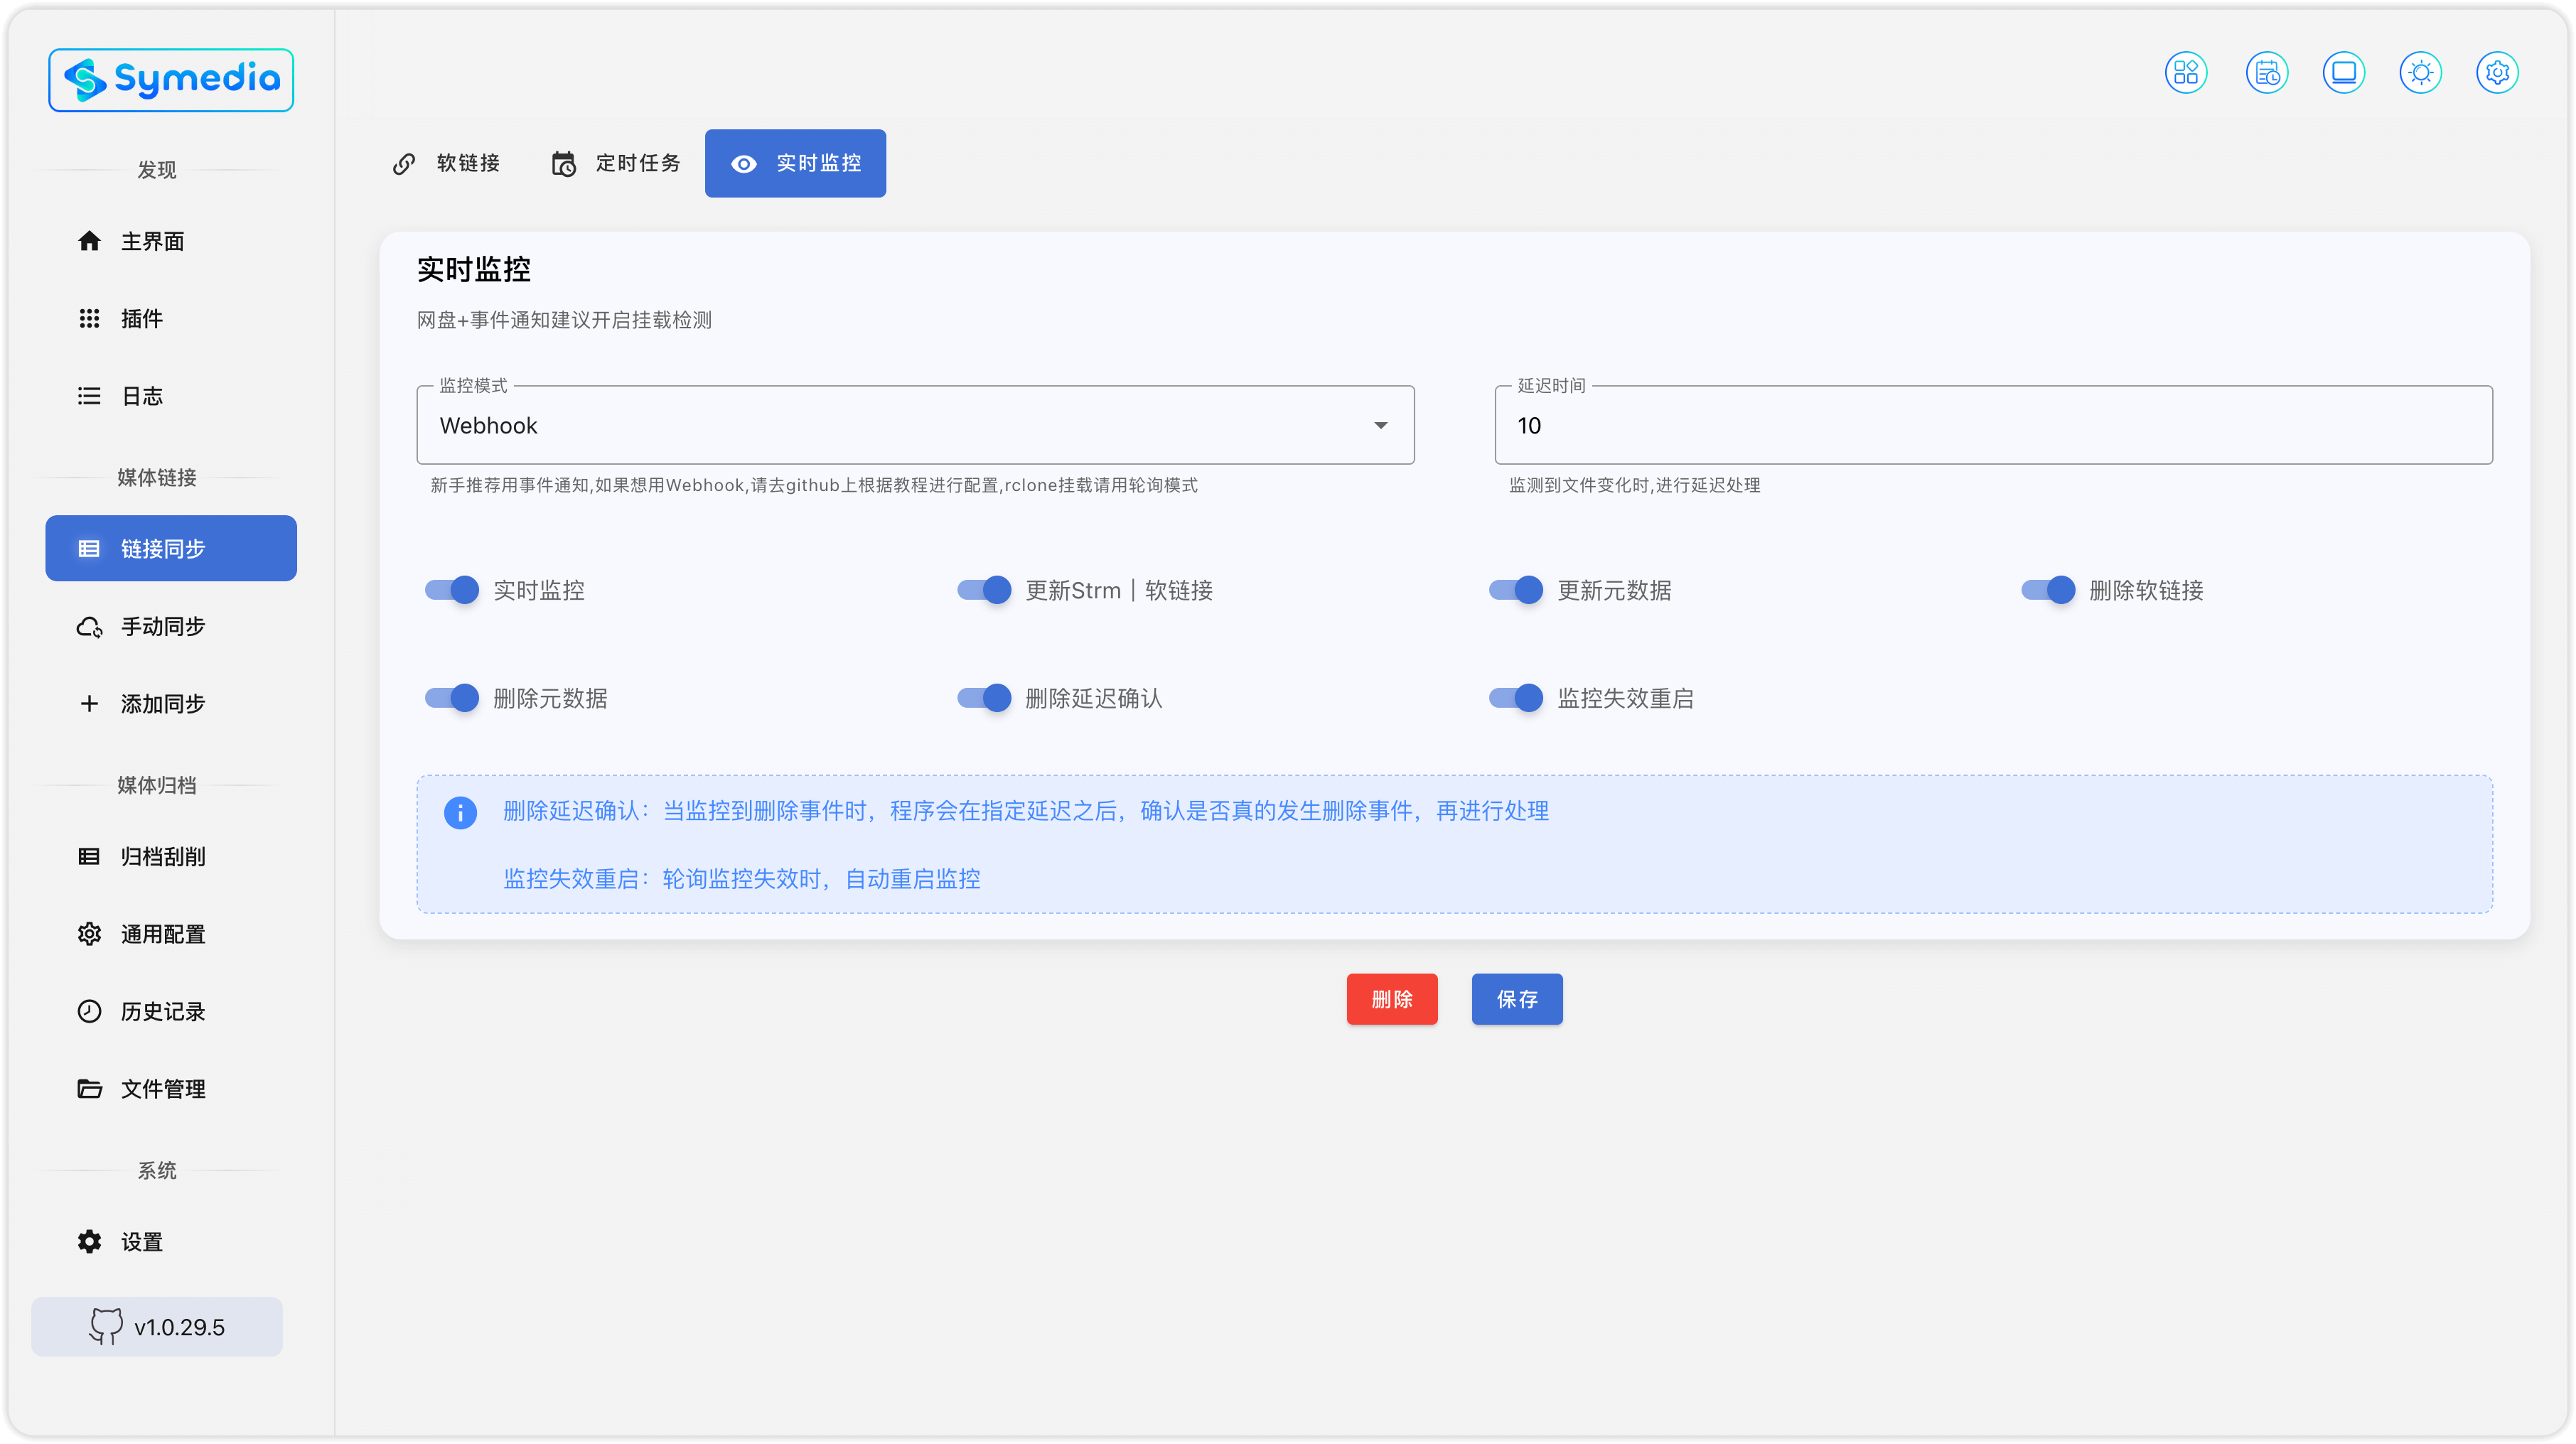
2.6 webhook 监控
注:webhook 不起作用:检查是否是 cd2 会员,cd2 要是 host 模式
上传 webhook.toml 文件到 cd2 的 config 的 webhooks 目录,修改 base_url 为自己的 sa 实际 IP 地址
不能直接下载 webhook.toml,则下载 zip 文件解压
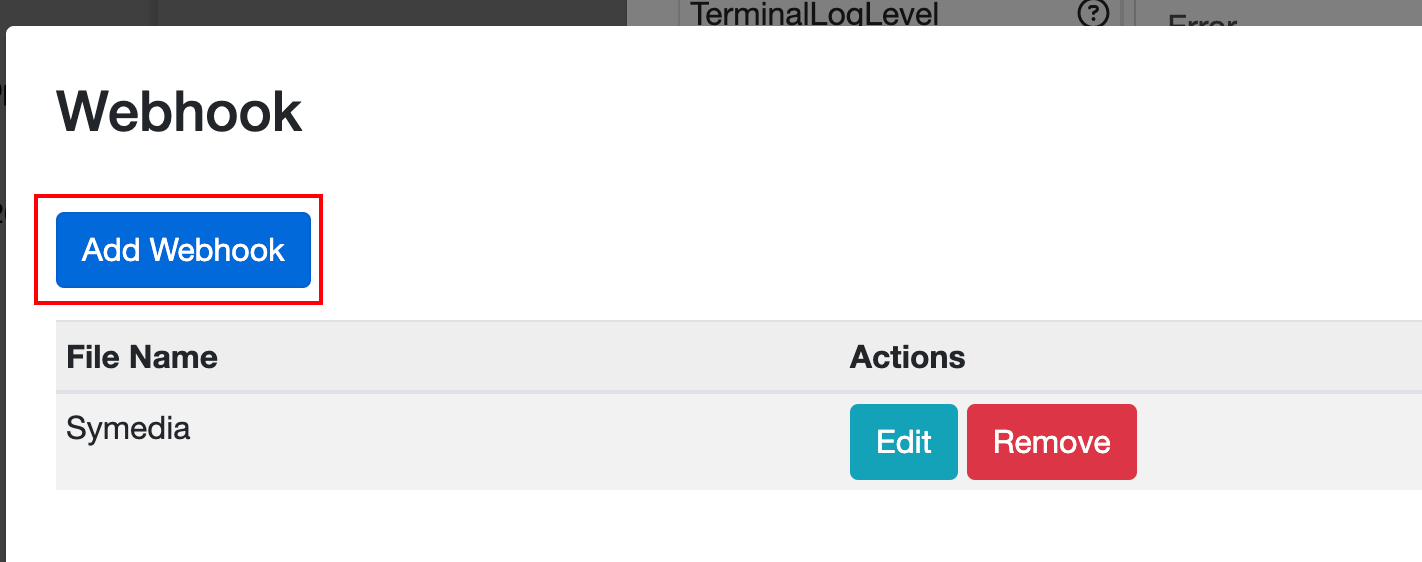
最新版 CloudDrive2 可以直接在网页中添加 webhook 配置,新建 webhook 后,将下列代码粘贴进去,修改 base_url 为自己的 sa 实际 IP 地址

# global variables: global variables are used to replace the placeholders in URL and body of the webhook
# {device_name} - The name of the device
# {user_name} - Current user name
# {version} - The version of the application
# {event_category} - The category of the event
# {event_name} - The name of the event
# {event_time} - The time of the event occurred, unix epoch time in seconds
# {send_time} - The time of the data sent, unix epoch time in seconds

# global parameters
[global_params]
# The base URL of the server to send the data to, the server must be able to receive POST requests
base_url = "http://localhost:8095"
# Whether the webhook is enabled
enabled = true

# The default http headers
[global_params.default_headers]
content-type = "application/json"
user-agent = "clouddrive2/{version}"
authorization = "basic usernamepassword"

# File system watcher webhook configuration
[file_system_watcher]
# The URL of the server to send the data to, the server must be able to receive POST requests
url = "{base_url}/api/v1/webhook/clouddrive2/file_notify?device_name={device_name}&user_name={user_name}&type={event_name}"
# http method, can be "GET" or "POST", if not specified, the default value is POST
method = "POST"
# Whether the file system watcher is enabled
enabled = true
# The body to be sent to the server can be a JSON string
# The following is a sample template for the data to be sent
# the json string should contains at least an array of file changes, each file change item shoud contain the following fields
# {event_category} - The category of the event is "file"
# {event_name} - The name of the event is "notify"
# {action} - The action of file change (create, delete, rename)
# {is_dir} - Whether the file is a directory (false: file, true: directory)
# {source_file} - The source file's path of the action
# {destination_file} - The destination file's path of the action, only valid for action rename(move)
body = '''
{
  "device_name": "{device_name}",
  "user_name": "{user_name}",
  "version": "{version}",
  "event_category": "{event_category}",
  "event_name": "{event_name}",
  "event_time": "{event_time}",
  "send_time": "{send_time}",
  "data": [
      {
        "action": "{action}",
        "is_dir": "{is_dir}",
        "source_file": "{source_file}",
        "destination_file": "{destination_file}"
      }
  ]
}
'''
# specify additional http headers for the file system watcher request if required, headers with same name will override in the default headers
[file_system_watcher.headers]
additional_header = "value"

# mount point watcher configuration
[mount_point_watcher]
# The URL of the server to send the data to, the server must be able to receive POST requests
url = "{base_url}/api/v1/webhook/clouddrive2/mount_notify?device_name={device_name}&user_name={user_name}&type={event_name}"
# http method
method = "POST"
# Whether the mount point watcher is enabled
enabled = true
# The body to be sent to the server can be a JSON string
# The following is a sample template for the data to be sent
# the mount_point_watcher should contains at least an array of mount point changes, each mount point change item shoud contain the following fields
# {event_category} - The category of the event is "mount_point"
# {event_name} - The name of the event is "mount" or "unmount"
# {action} - The action of mount point change (mount, unmount)
# {mount_point} - The mount point's path of the action
# {status} - The status of the action (true for success, false for failed)
# {reason} - The failed reason, empty string means success
body = '''
{
  "device_name": "{device_name}",
  "user_name": "{user_name}",
  "version": "{version}",
  "event_category": "{event_category}",
  "event_name": "{event_name}",
  "event_time": "{event_time}",
  "send_time": "{send_time}",
  "data": [
      {
        "action": "{action}",
        "mount_point": "{mount_point}",
        "status": "{status}",
        "reason": "{reason}"
      }
  ]
}
'''
# specify additional http headers for the file system watcher request if required, headers with same name will override in the default headers
[mount_point_watcher.headers]
user-agent = "clouddrive2/{version}/mount"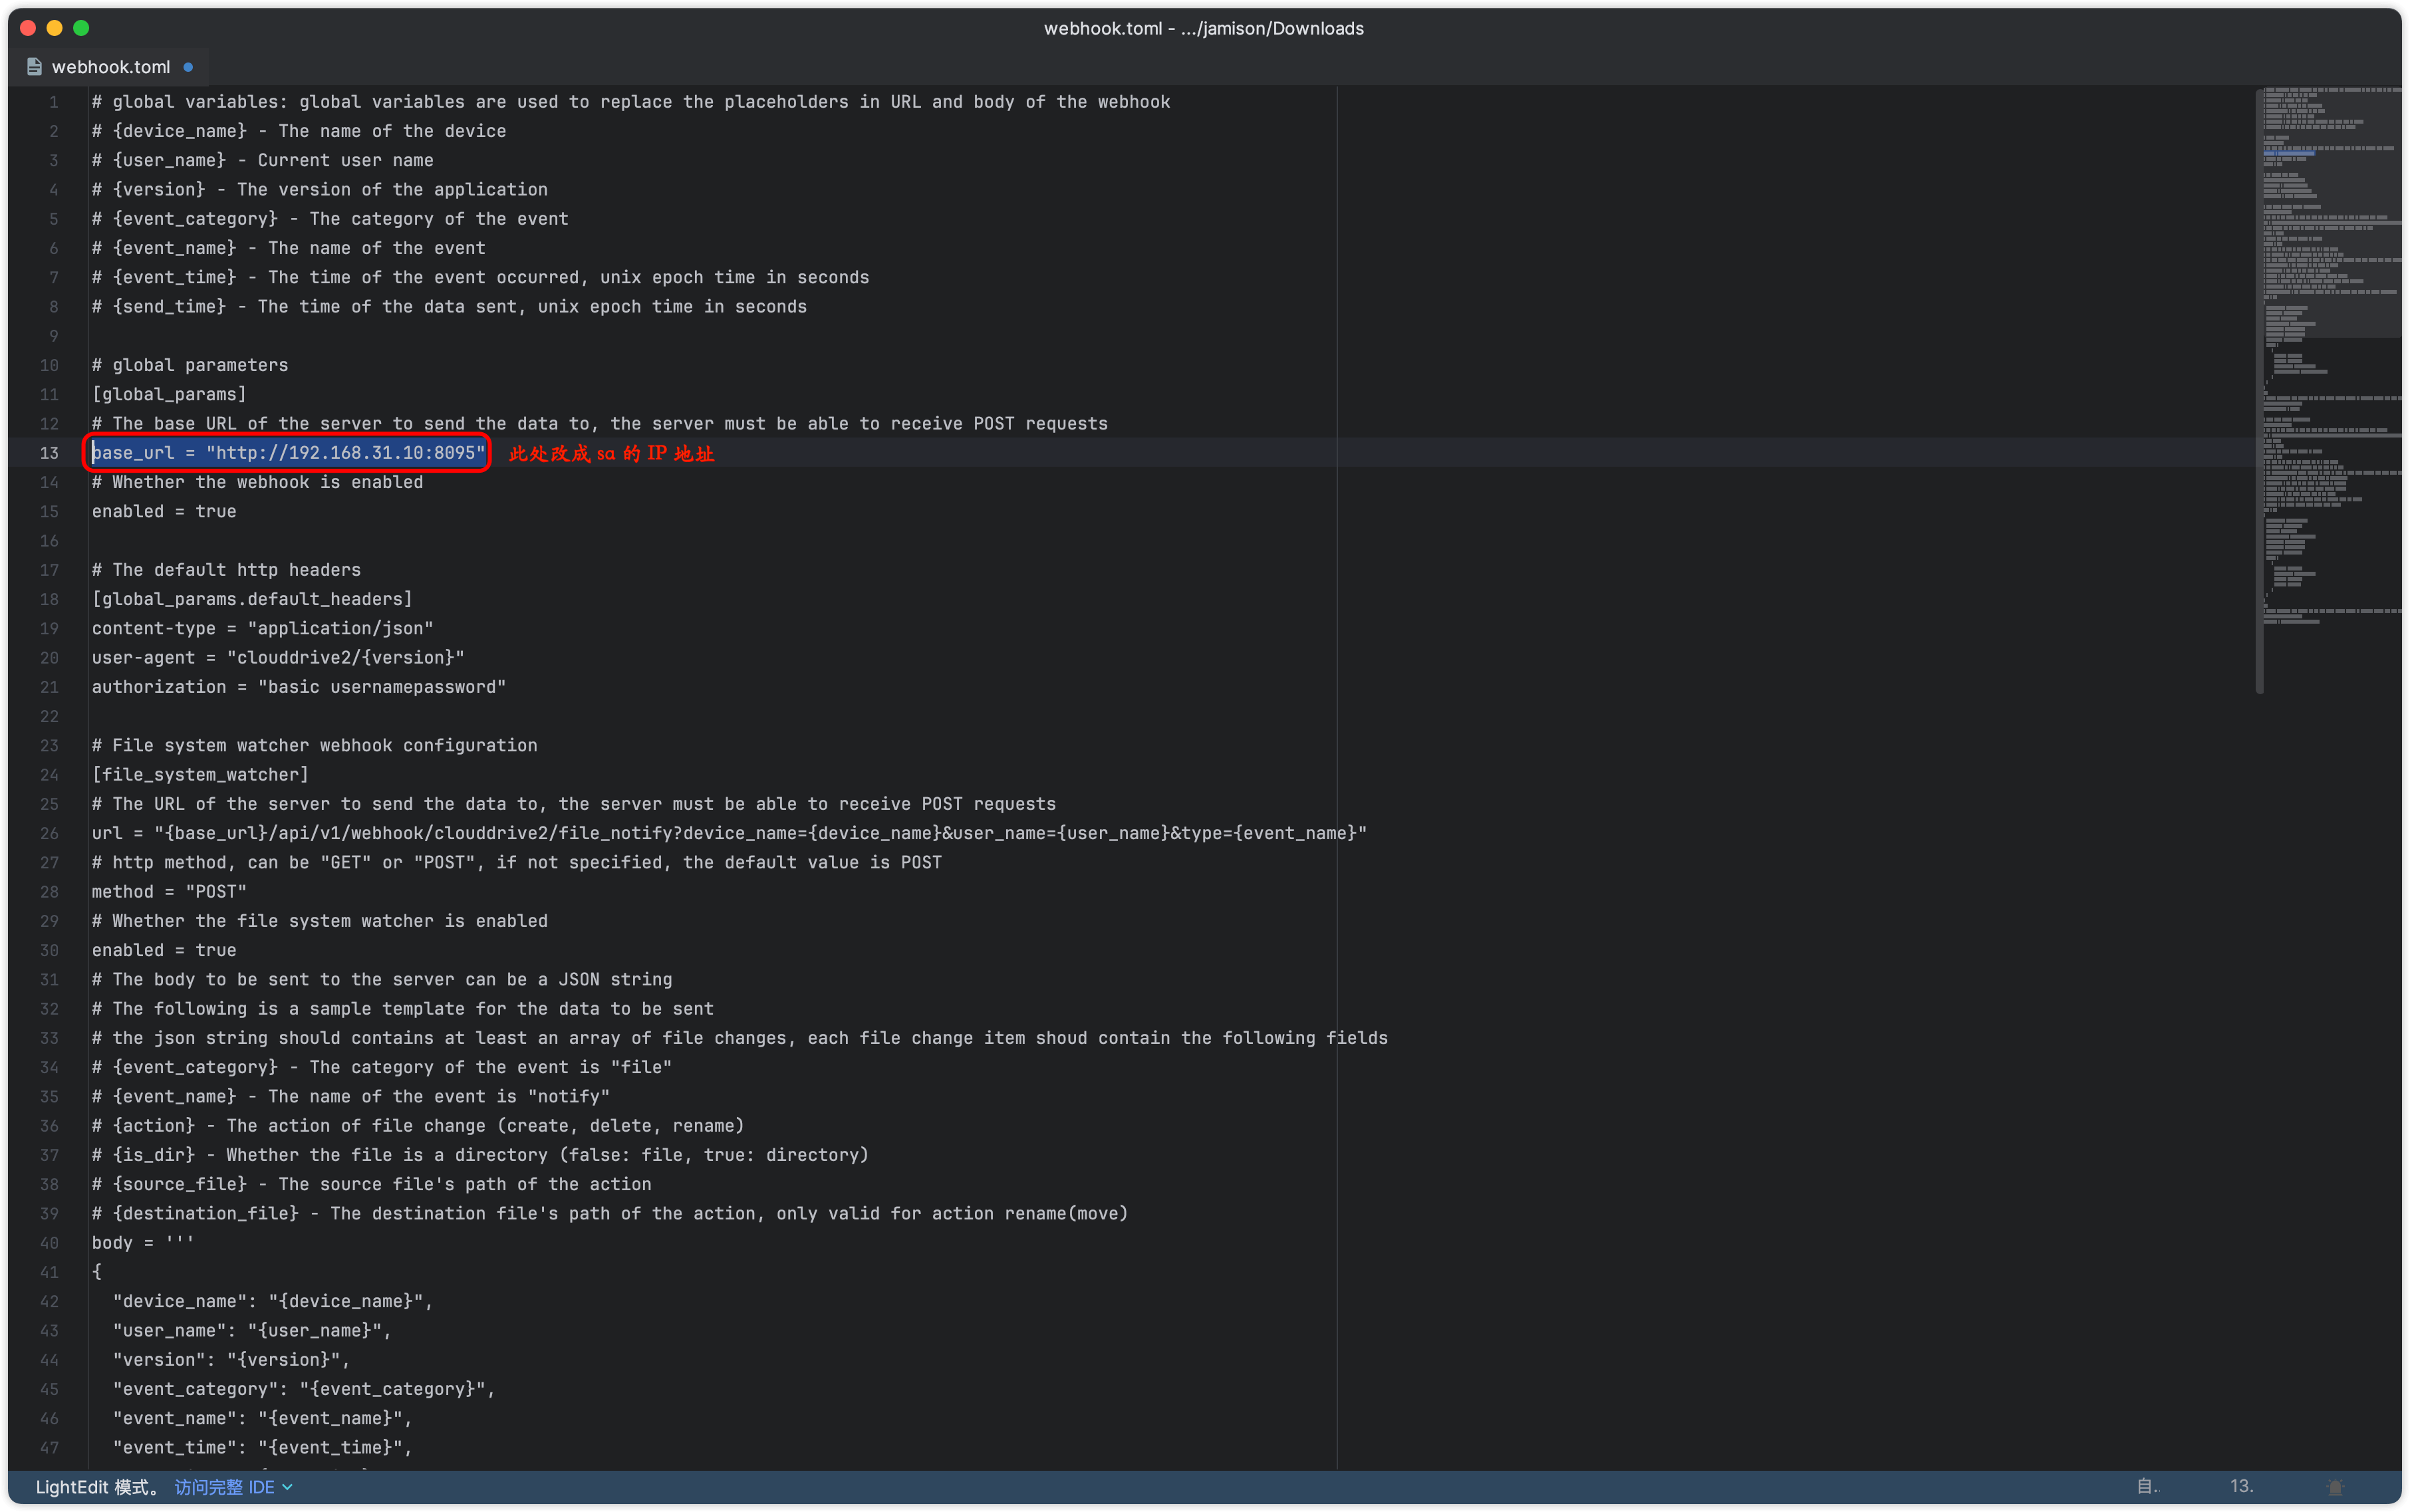
重启 cd2 生效
开启 webhook 监控,大媒体库(500T 以上)可以不开 cd2 永久缓存,可实时监控。
2.7 归档
https://blog.viplee.cc/archives/symedia-archive-scrape
2.8 TG bot 保姆级教程
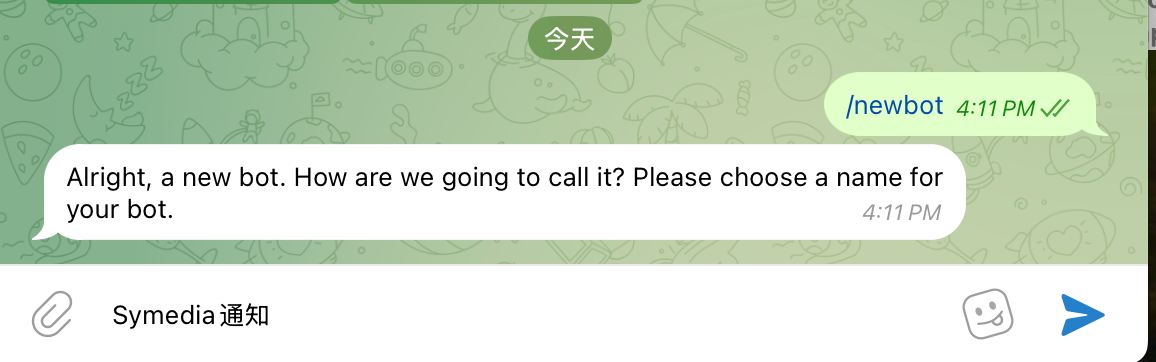
(1). 打开 telegram,在顶部栏搜索 @BotFather 【 https://t.me/BotFather】
(2). 点击左下角菜单栏,点击最顶部 /neewbot
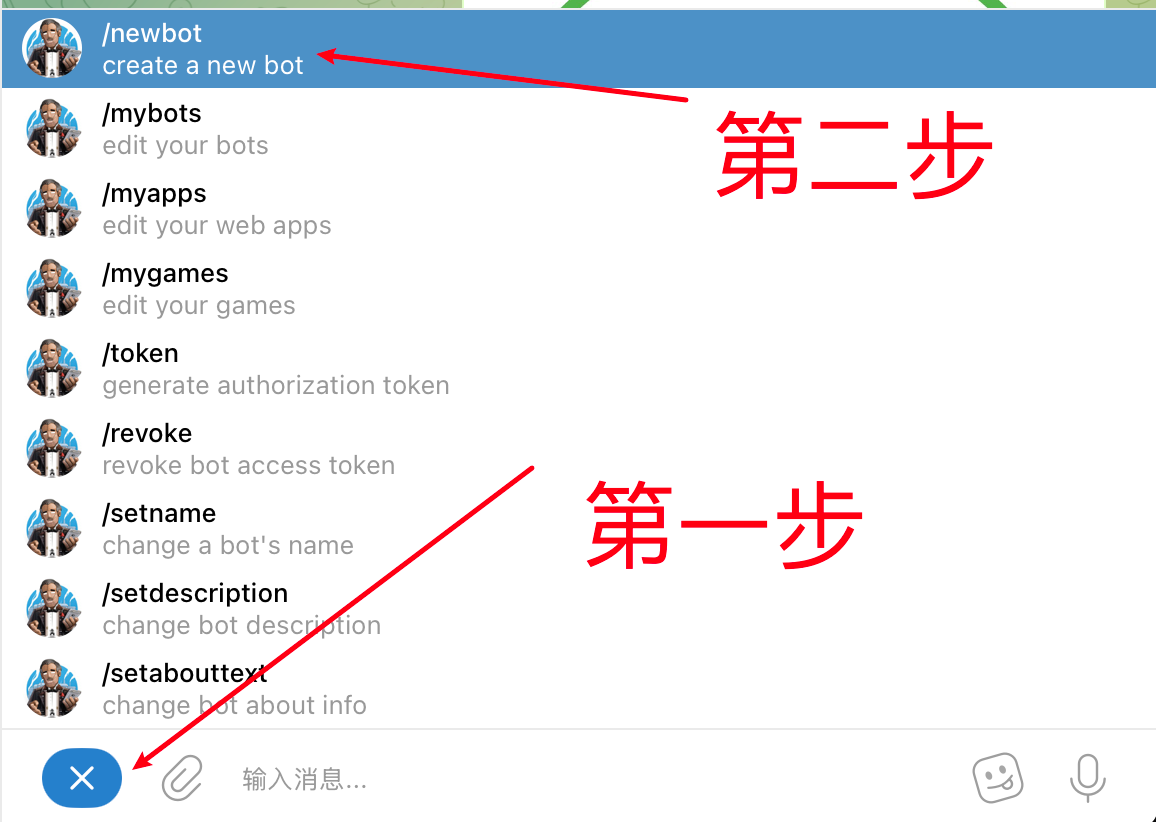
(3). 输入 Symedia 通知 的名称或自己取名
(4). 给自己的机器人起一个独一无二的 ID。注意:以 bot 或 _bot 结尾
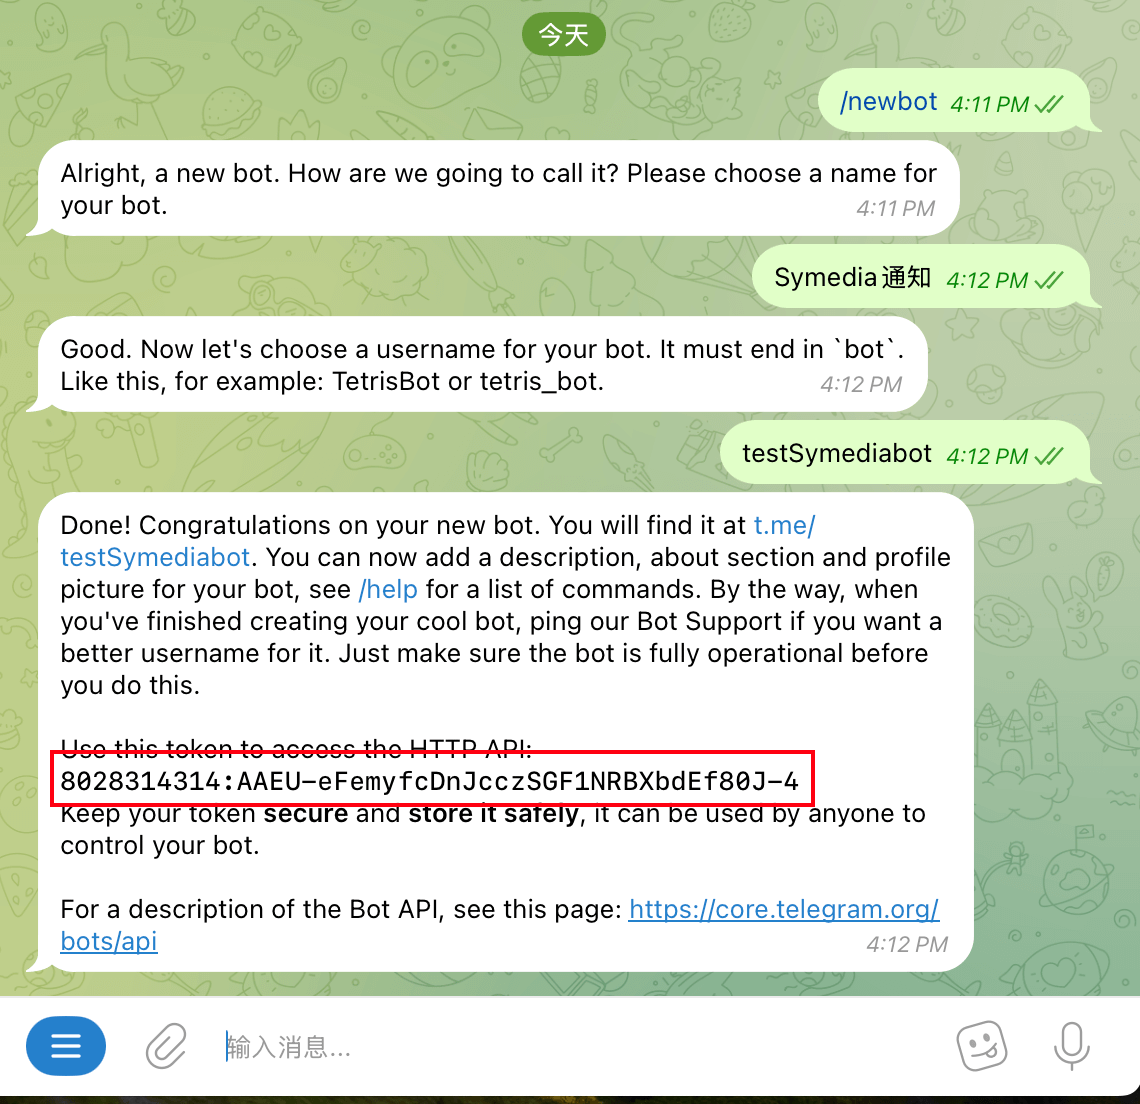
(5). 保存图中的 API,一会儿要用到
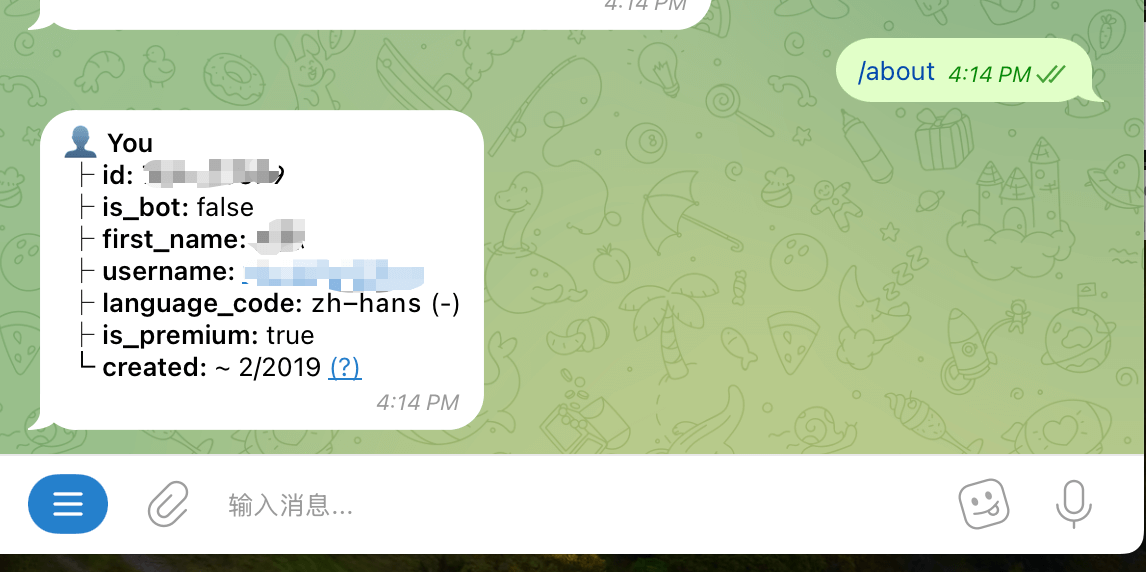
(6). 获取自己的 ID,telegram 搜索 @getidsbot 【https://t.me/getidsbot】
同理点击左下角菜单,或输入 /about,等待机器人返回第一行:ID:XXXXXXX,复制保存
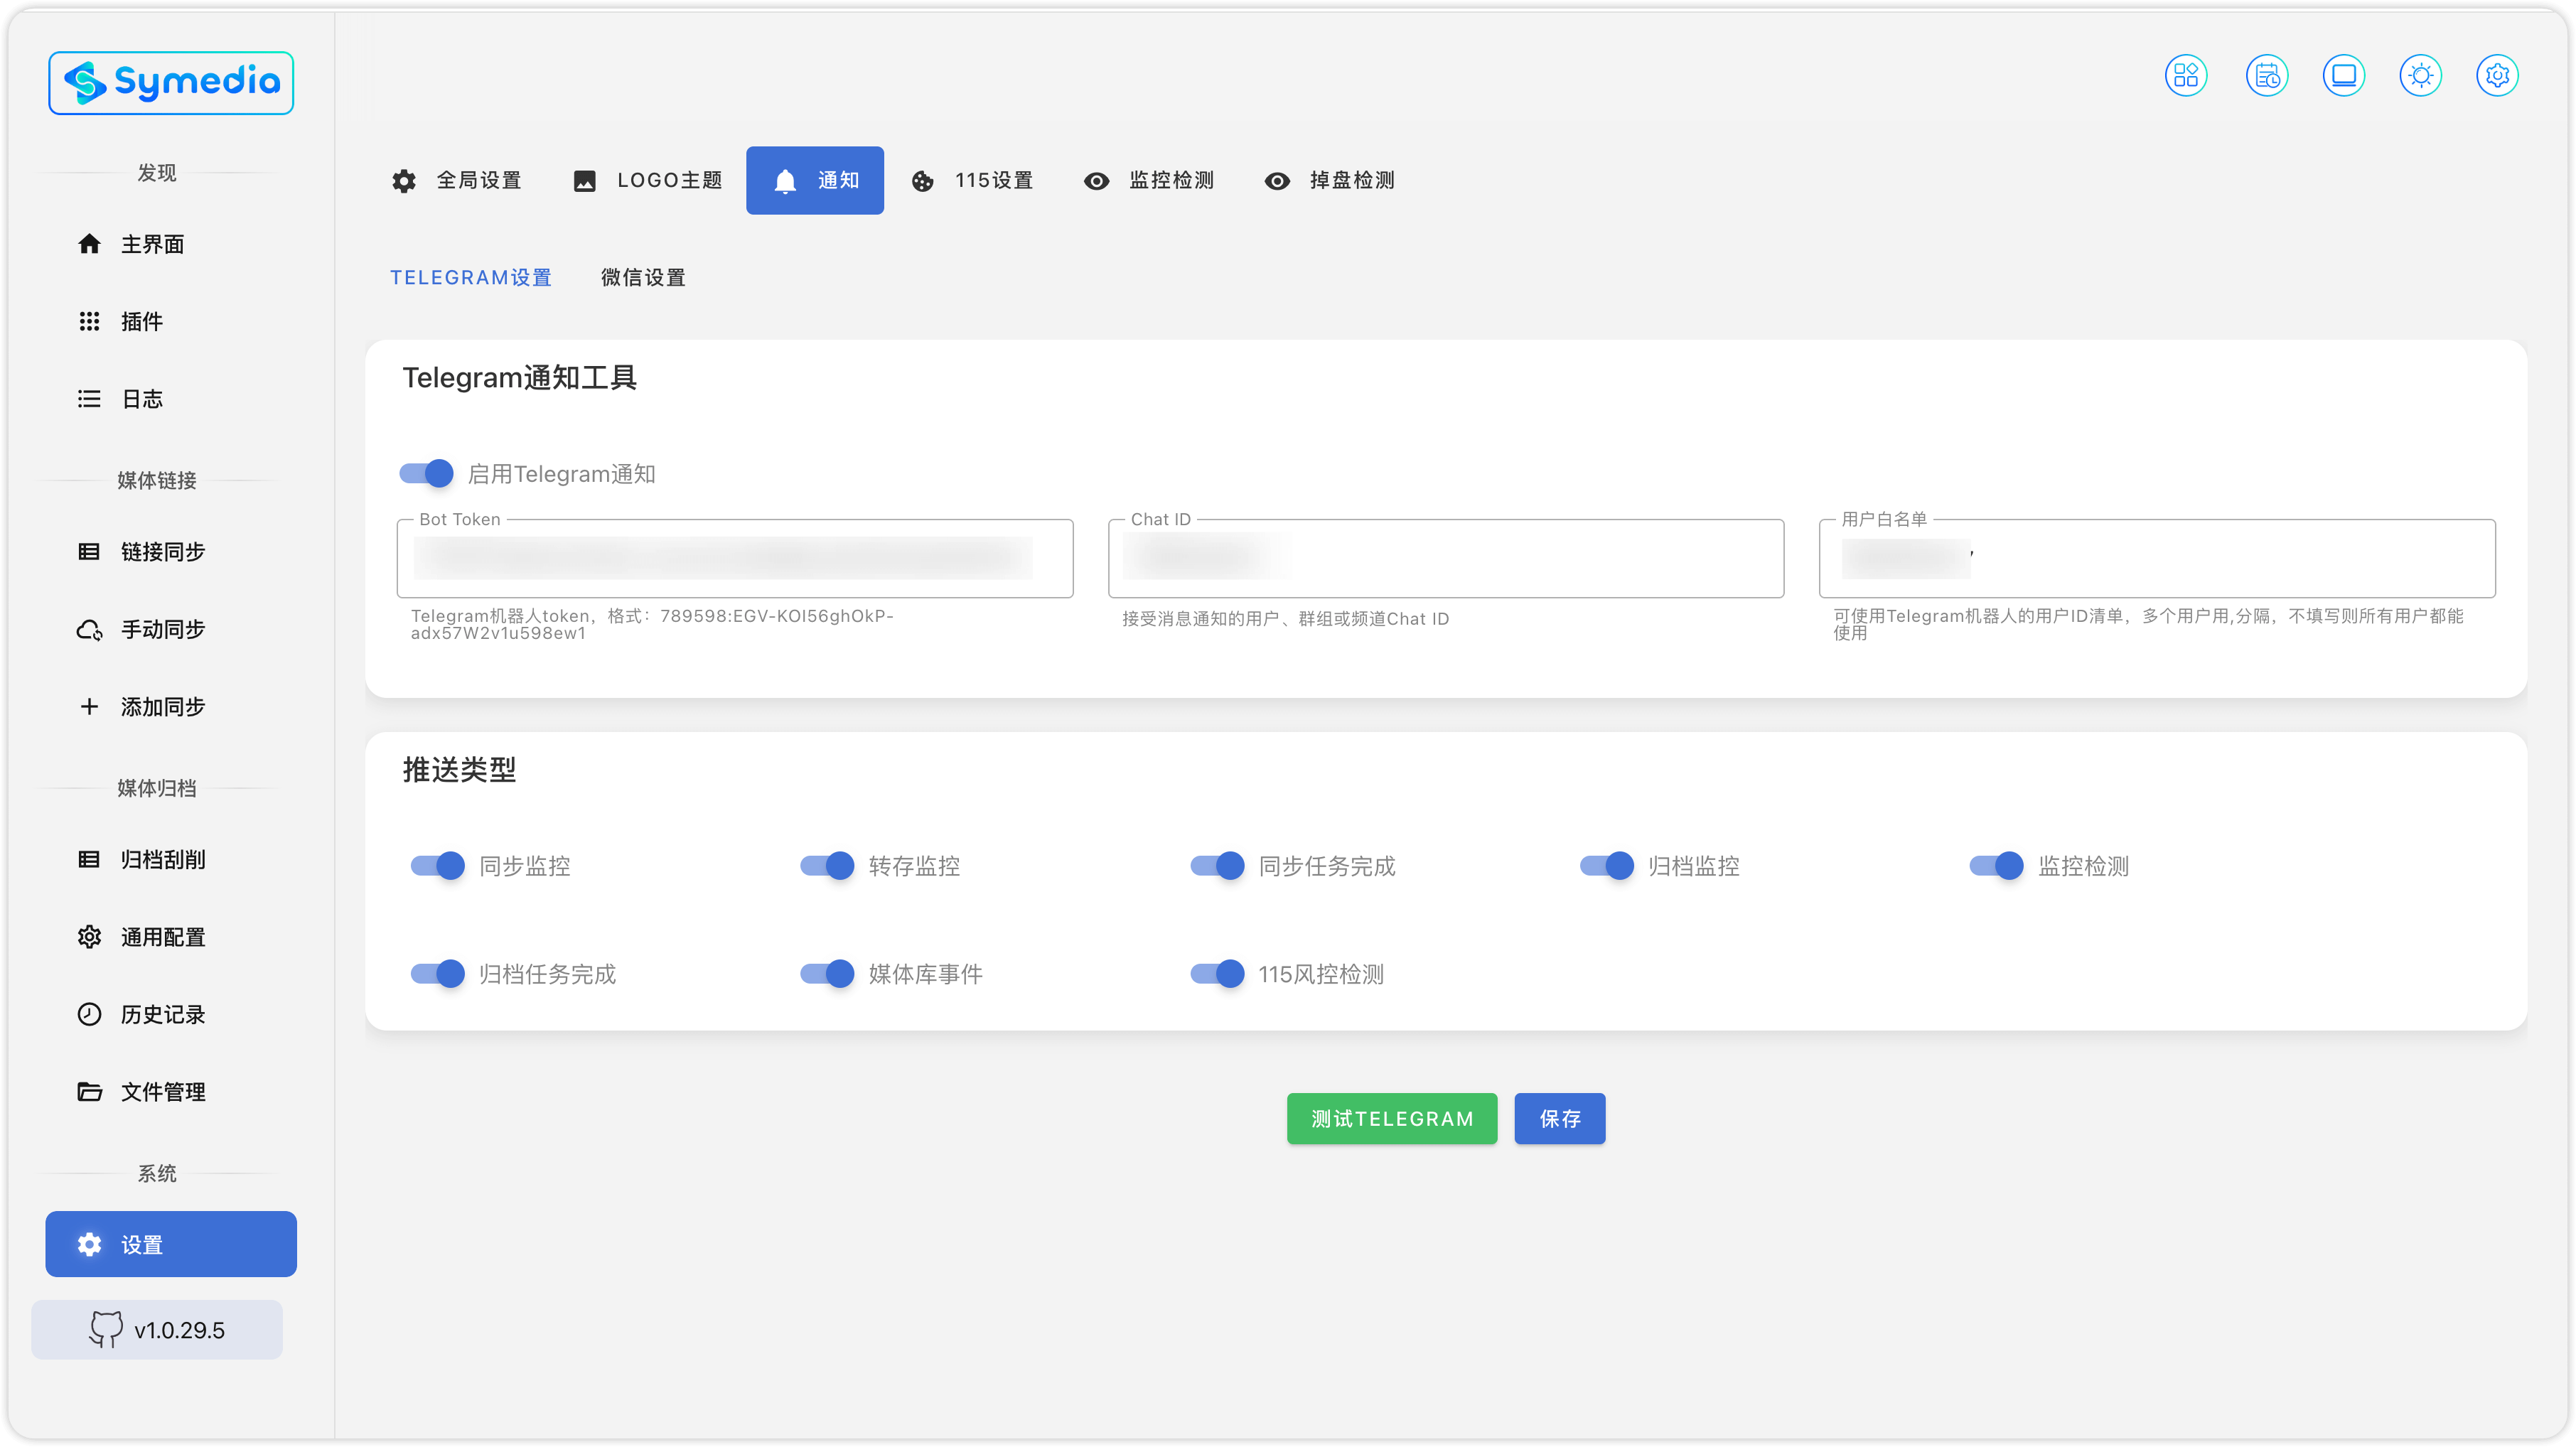
(7). 配置 SA bot,开启 SA,左侧菜单栏打开设置 → 通知
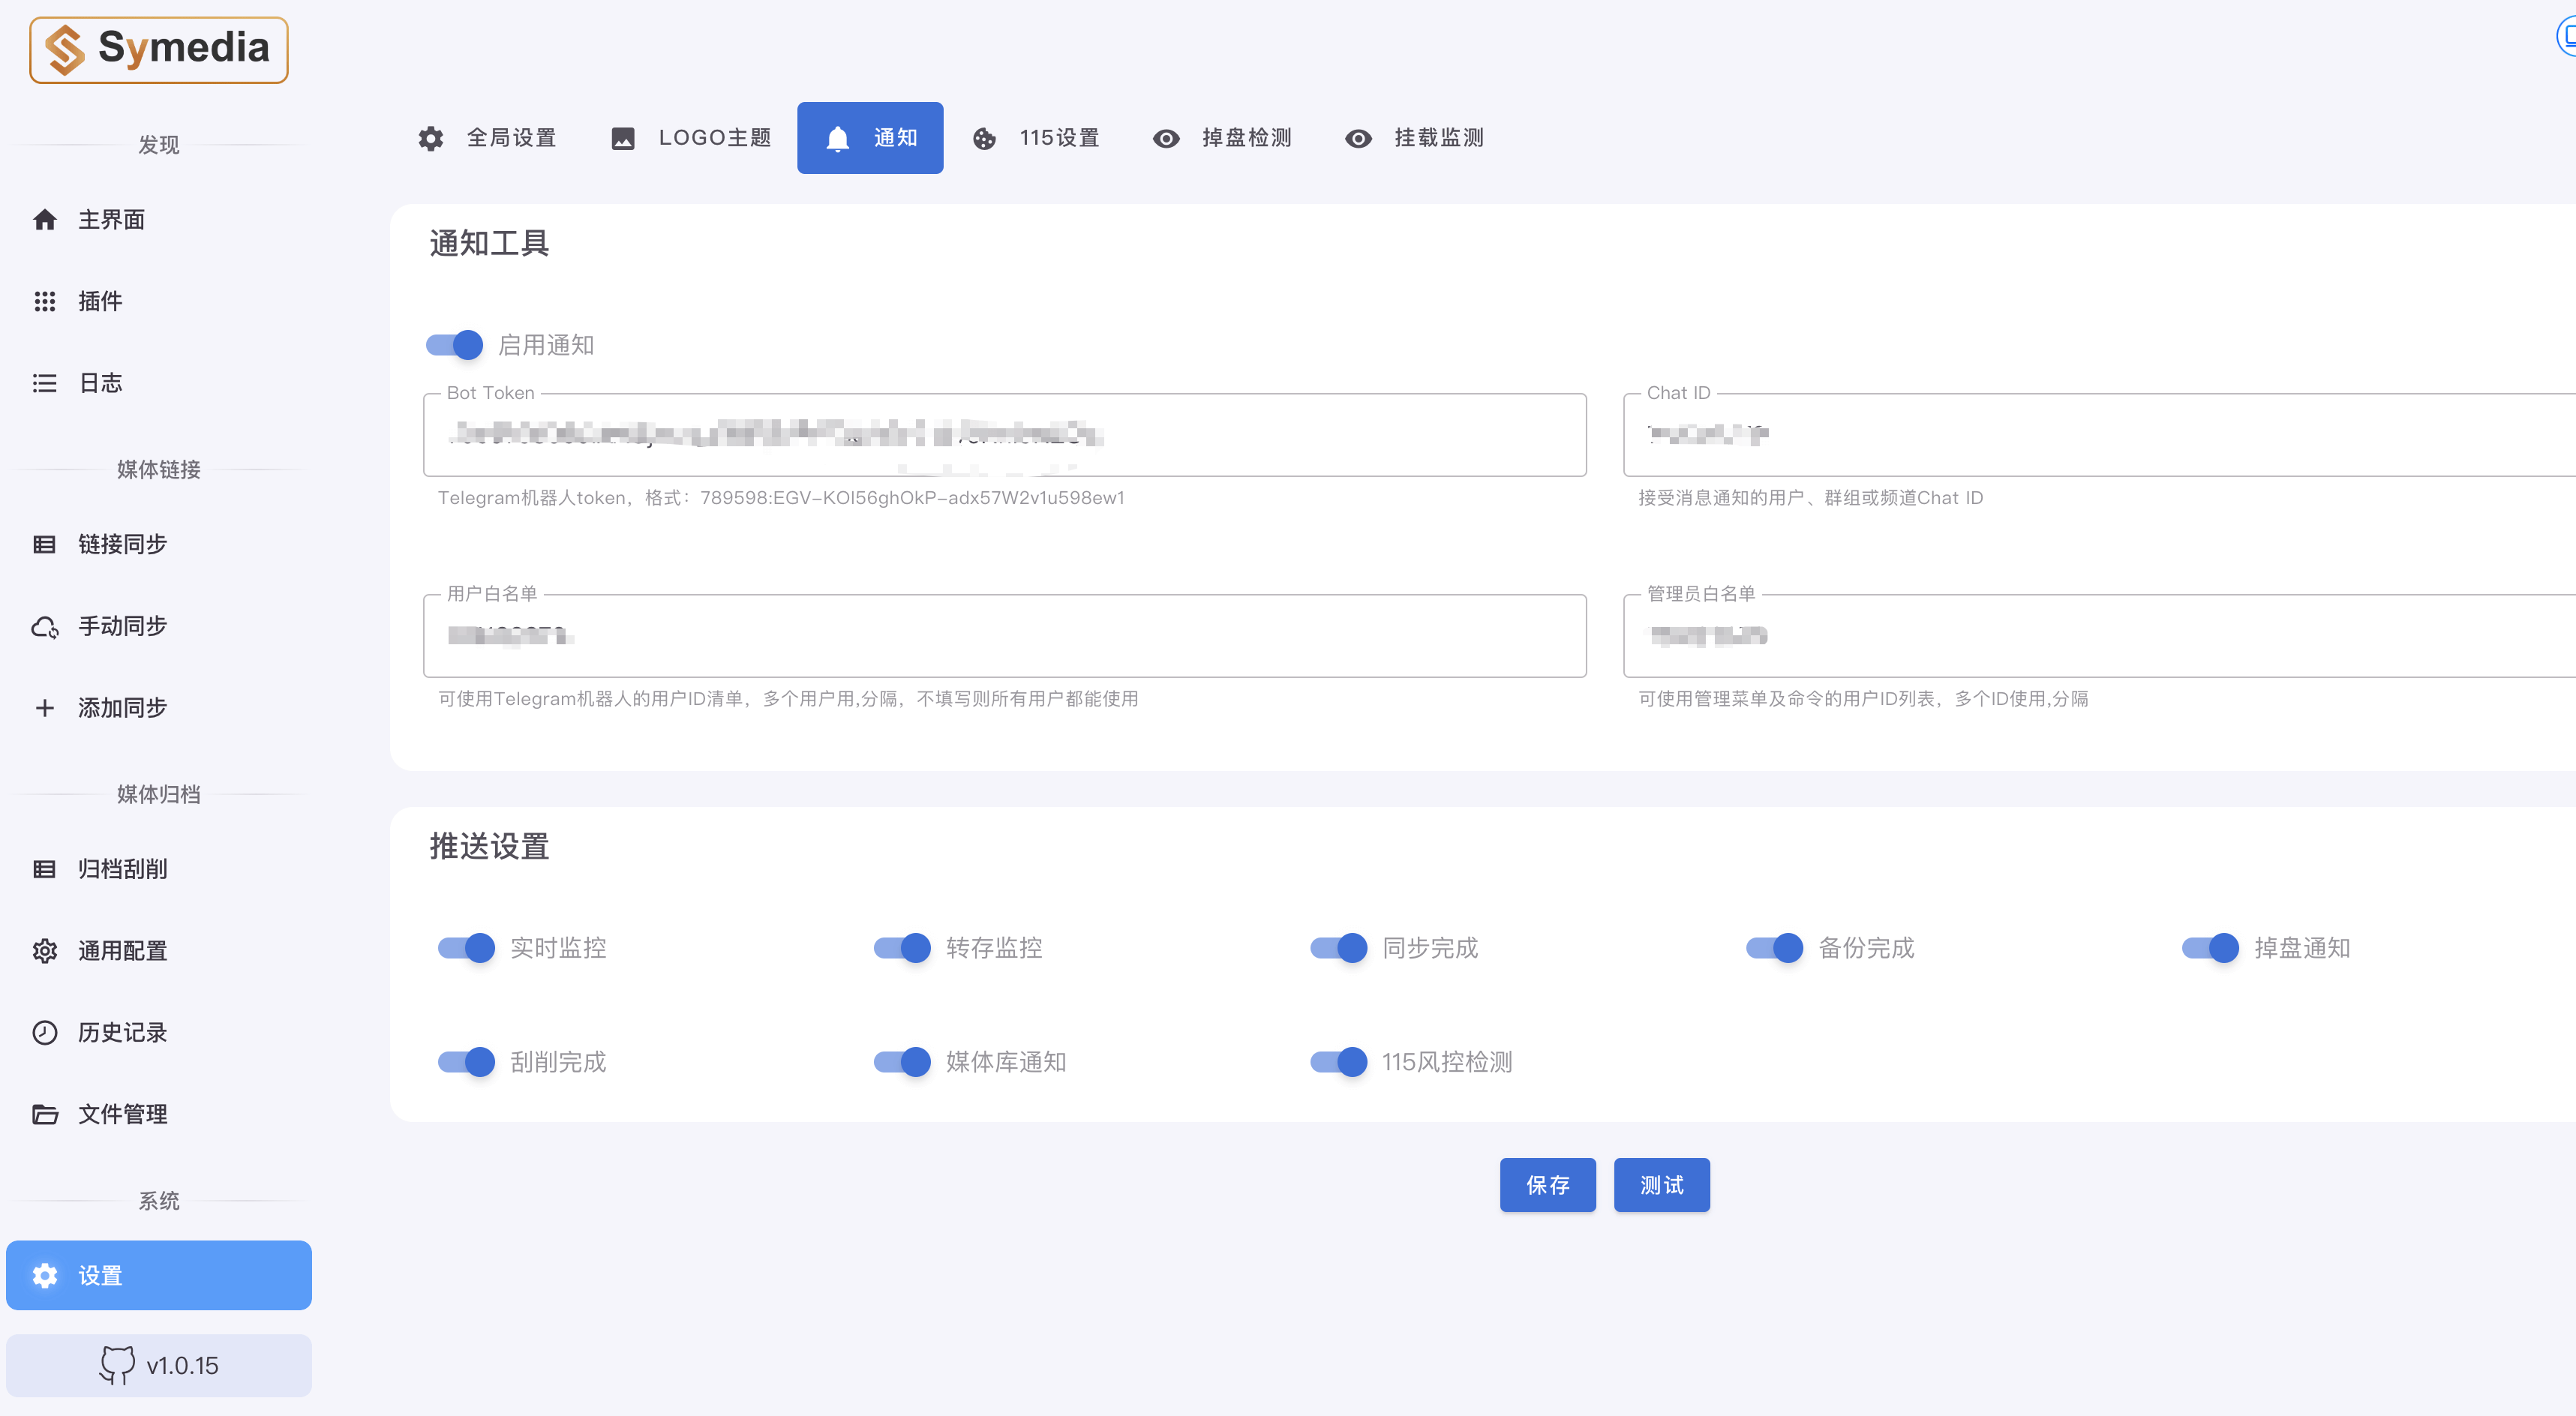
左侧第一行,填入刚刚从 @botfather 获取的 API,其他三个文本框,均输入 @getidsbot 获取的 ID,将下面八个开关按需打开,再点击保存和测试,看看机器人是否给你发送通知,如下图
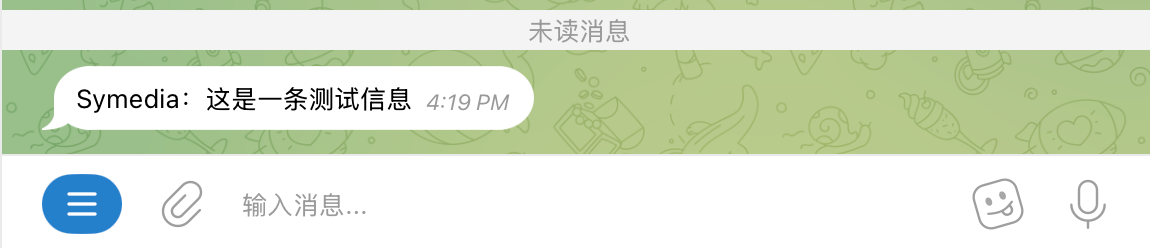
如果收到此测试消息,则可以正常使用
2.9 插件配置
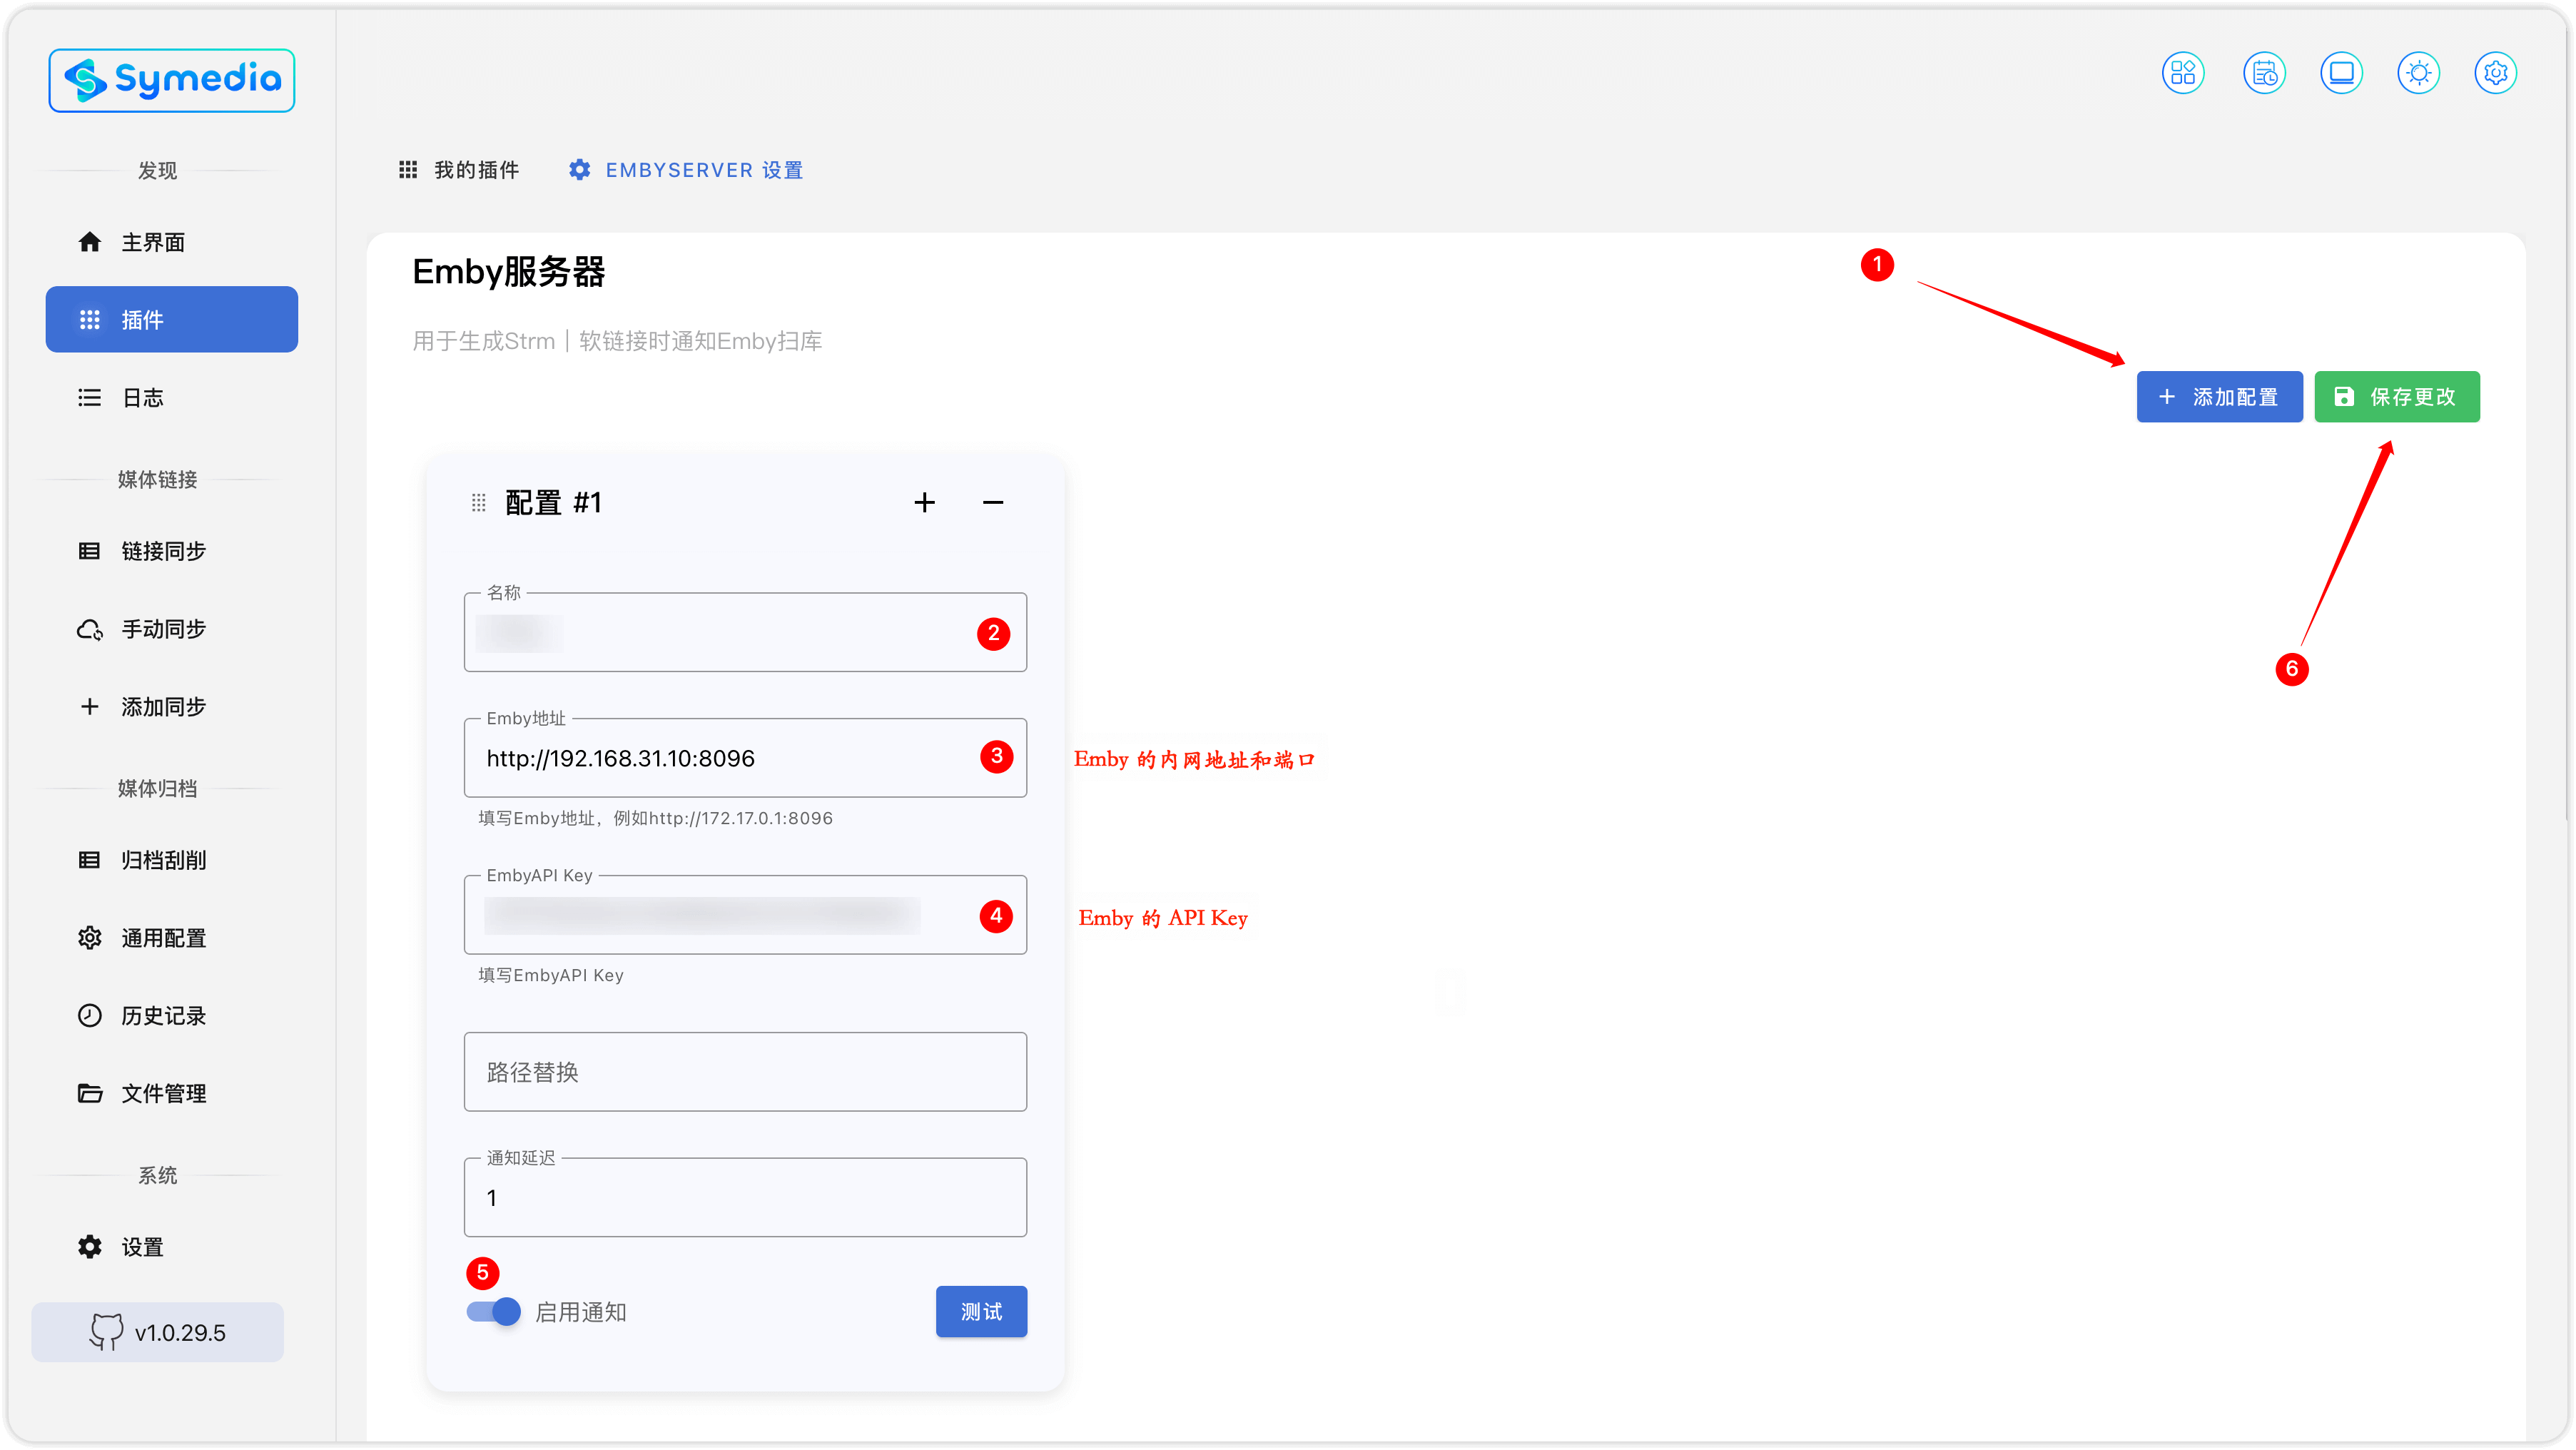
- EmbyServer
Emby 媒体服务器通知:需要设置媒体服务器 Webhook,回调相对路径为 /api/v1/webhook/mediamsg/emby/{Emby IP:端口}/{Emby API Key}?token=symedia(8095 端口),其中 symedia 为设置的 API\_TOKEN。
http://172.17.0.1:8095/api/v1/webhook/mediamsg/emby/172.17.0.1:8096/770131037e8e49459618af98c14de06c?token=symedia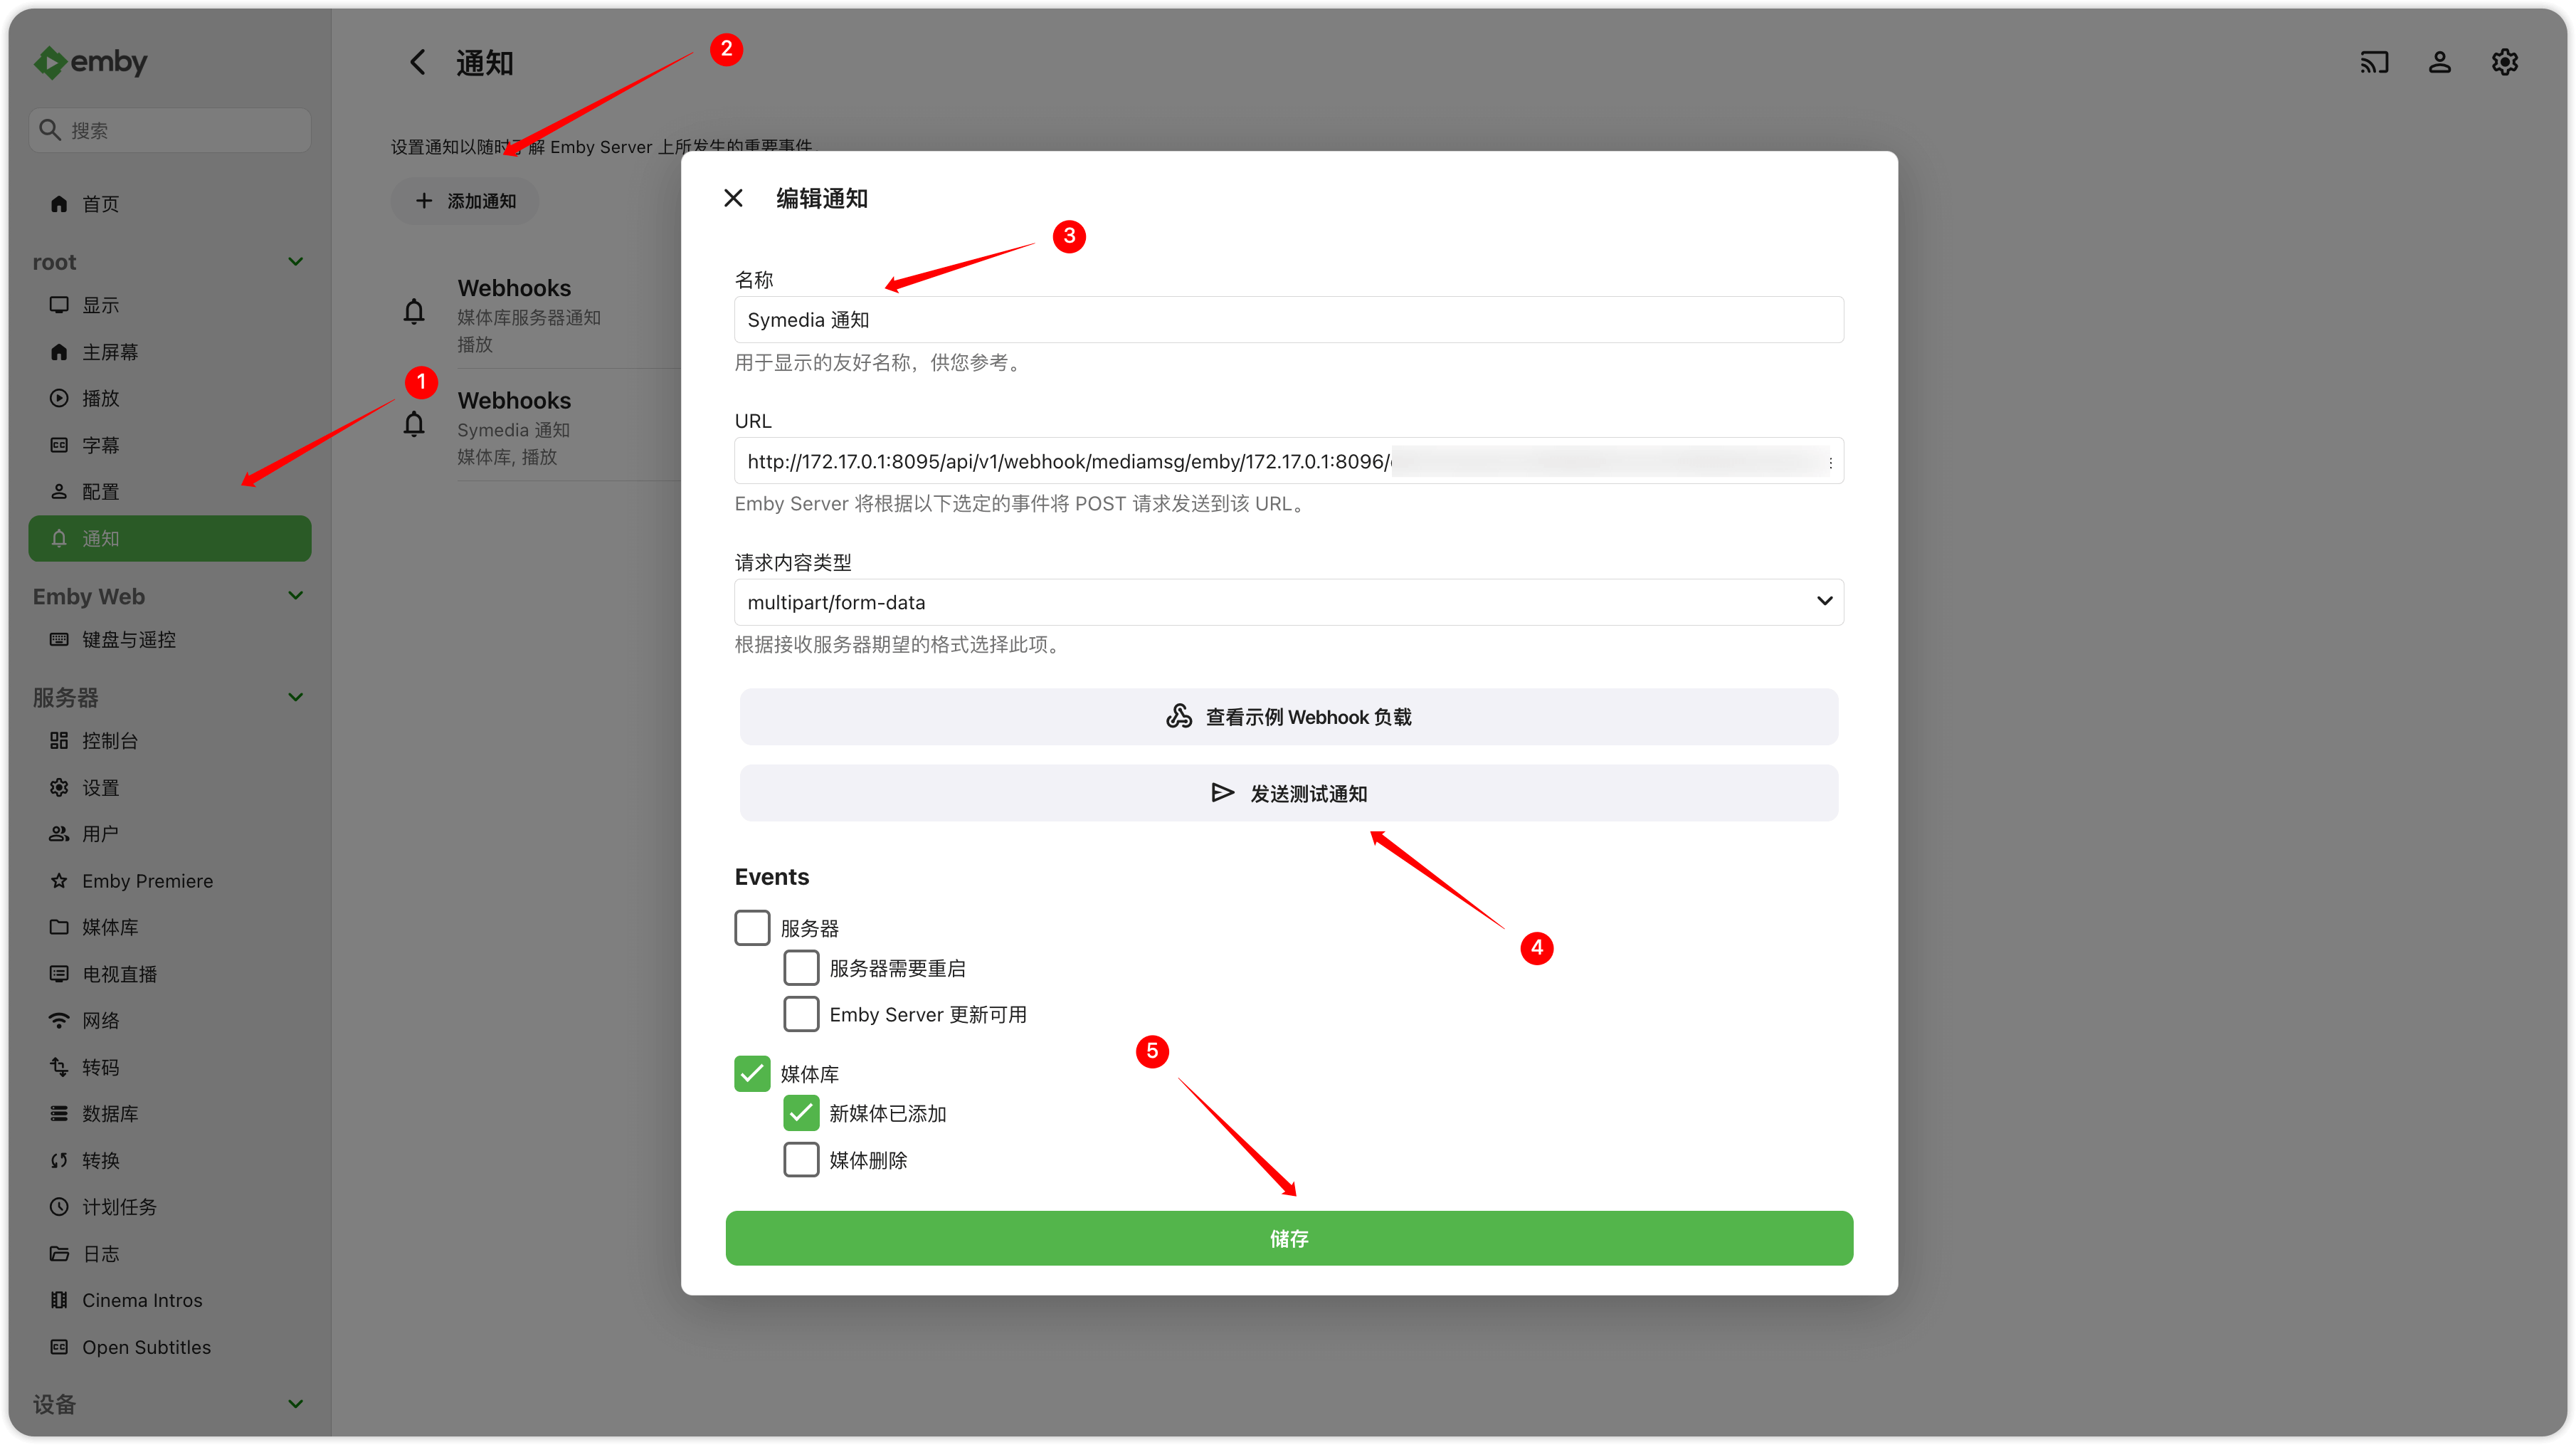
路径替换:Emby 和 Symedia 对于同一个目录映射方式相同时可以不填
Emby 通知的原理是把生成的 Strm |软链接的路径通知给 Emby,让 Emby 去扫描该路径,如果 Strm |软链接的目录在 Symedia 和 Emby 中的映射不一样,则需要在这里进行替换。因此建议 Symedia 和 Emby 在映射目录时尽量保持一致
支持的配置格式(注意空格):多个配置用 隔开
被替换路径 1 => 替换路径 1;被替换路径 2 => 替换路径 2;...
示例:比如对于
/mnt/Symlink
- 在 Symedia 中的映射为
/mnt/Symlink:/Symedia/Symlink- 在 Emby 中的映射为
/mnt/Symlink:/Emby/Symlink- 我们就需要把
/Symedia/Symlink替换为/Emby/Symlink- 那么路径替换就是
/Symedia/Symlink => /Emby/Symlink
另外提及一点,按照上面的示例,如果是这么配置的情况下,这里的路径替换可以不用填写
对于
/mnt/Symlink
- 在 Symedia 中的映射为
/mnt/Symlink:/Symlink- 在 Emby 中的映射为
/mnt/Symlink:/Symlink就是说,把实际的物理机实际路径
/mnt/Symlink,给到两个容器(Symedia、Emby)的映射路径用同一个路径/Symlink进行映射,这样就不需要替换路径啦
注意!!!
如果遇到 Emby 的通知测试失败,需要给 Emby 添加这三条环境变量
HTTP_PROXY=http://192.168.9.5:7890

ALL_PROXY=http://192.168.9.5:7890

NO_PROXY=172.17.0.1,127.0.0.1,localhost
3. FastEmby
待补充一个 Emby 设置
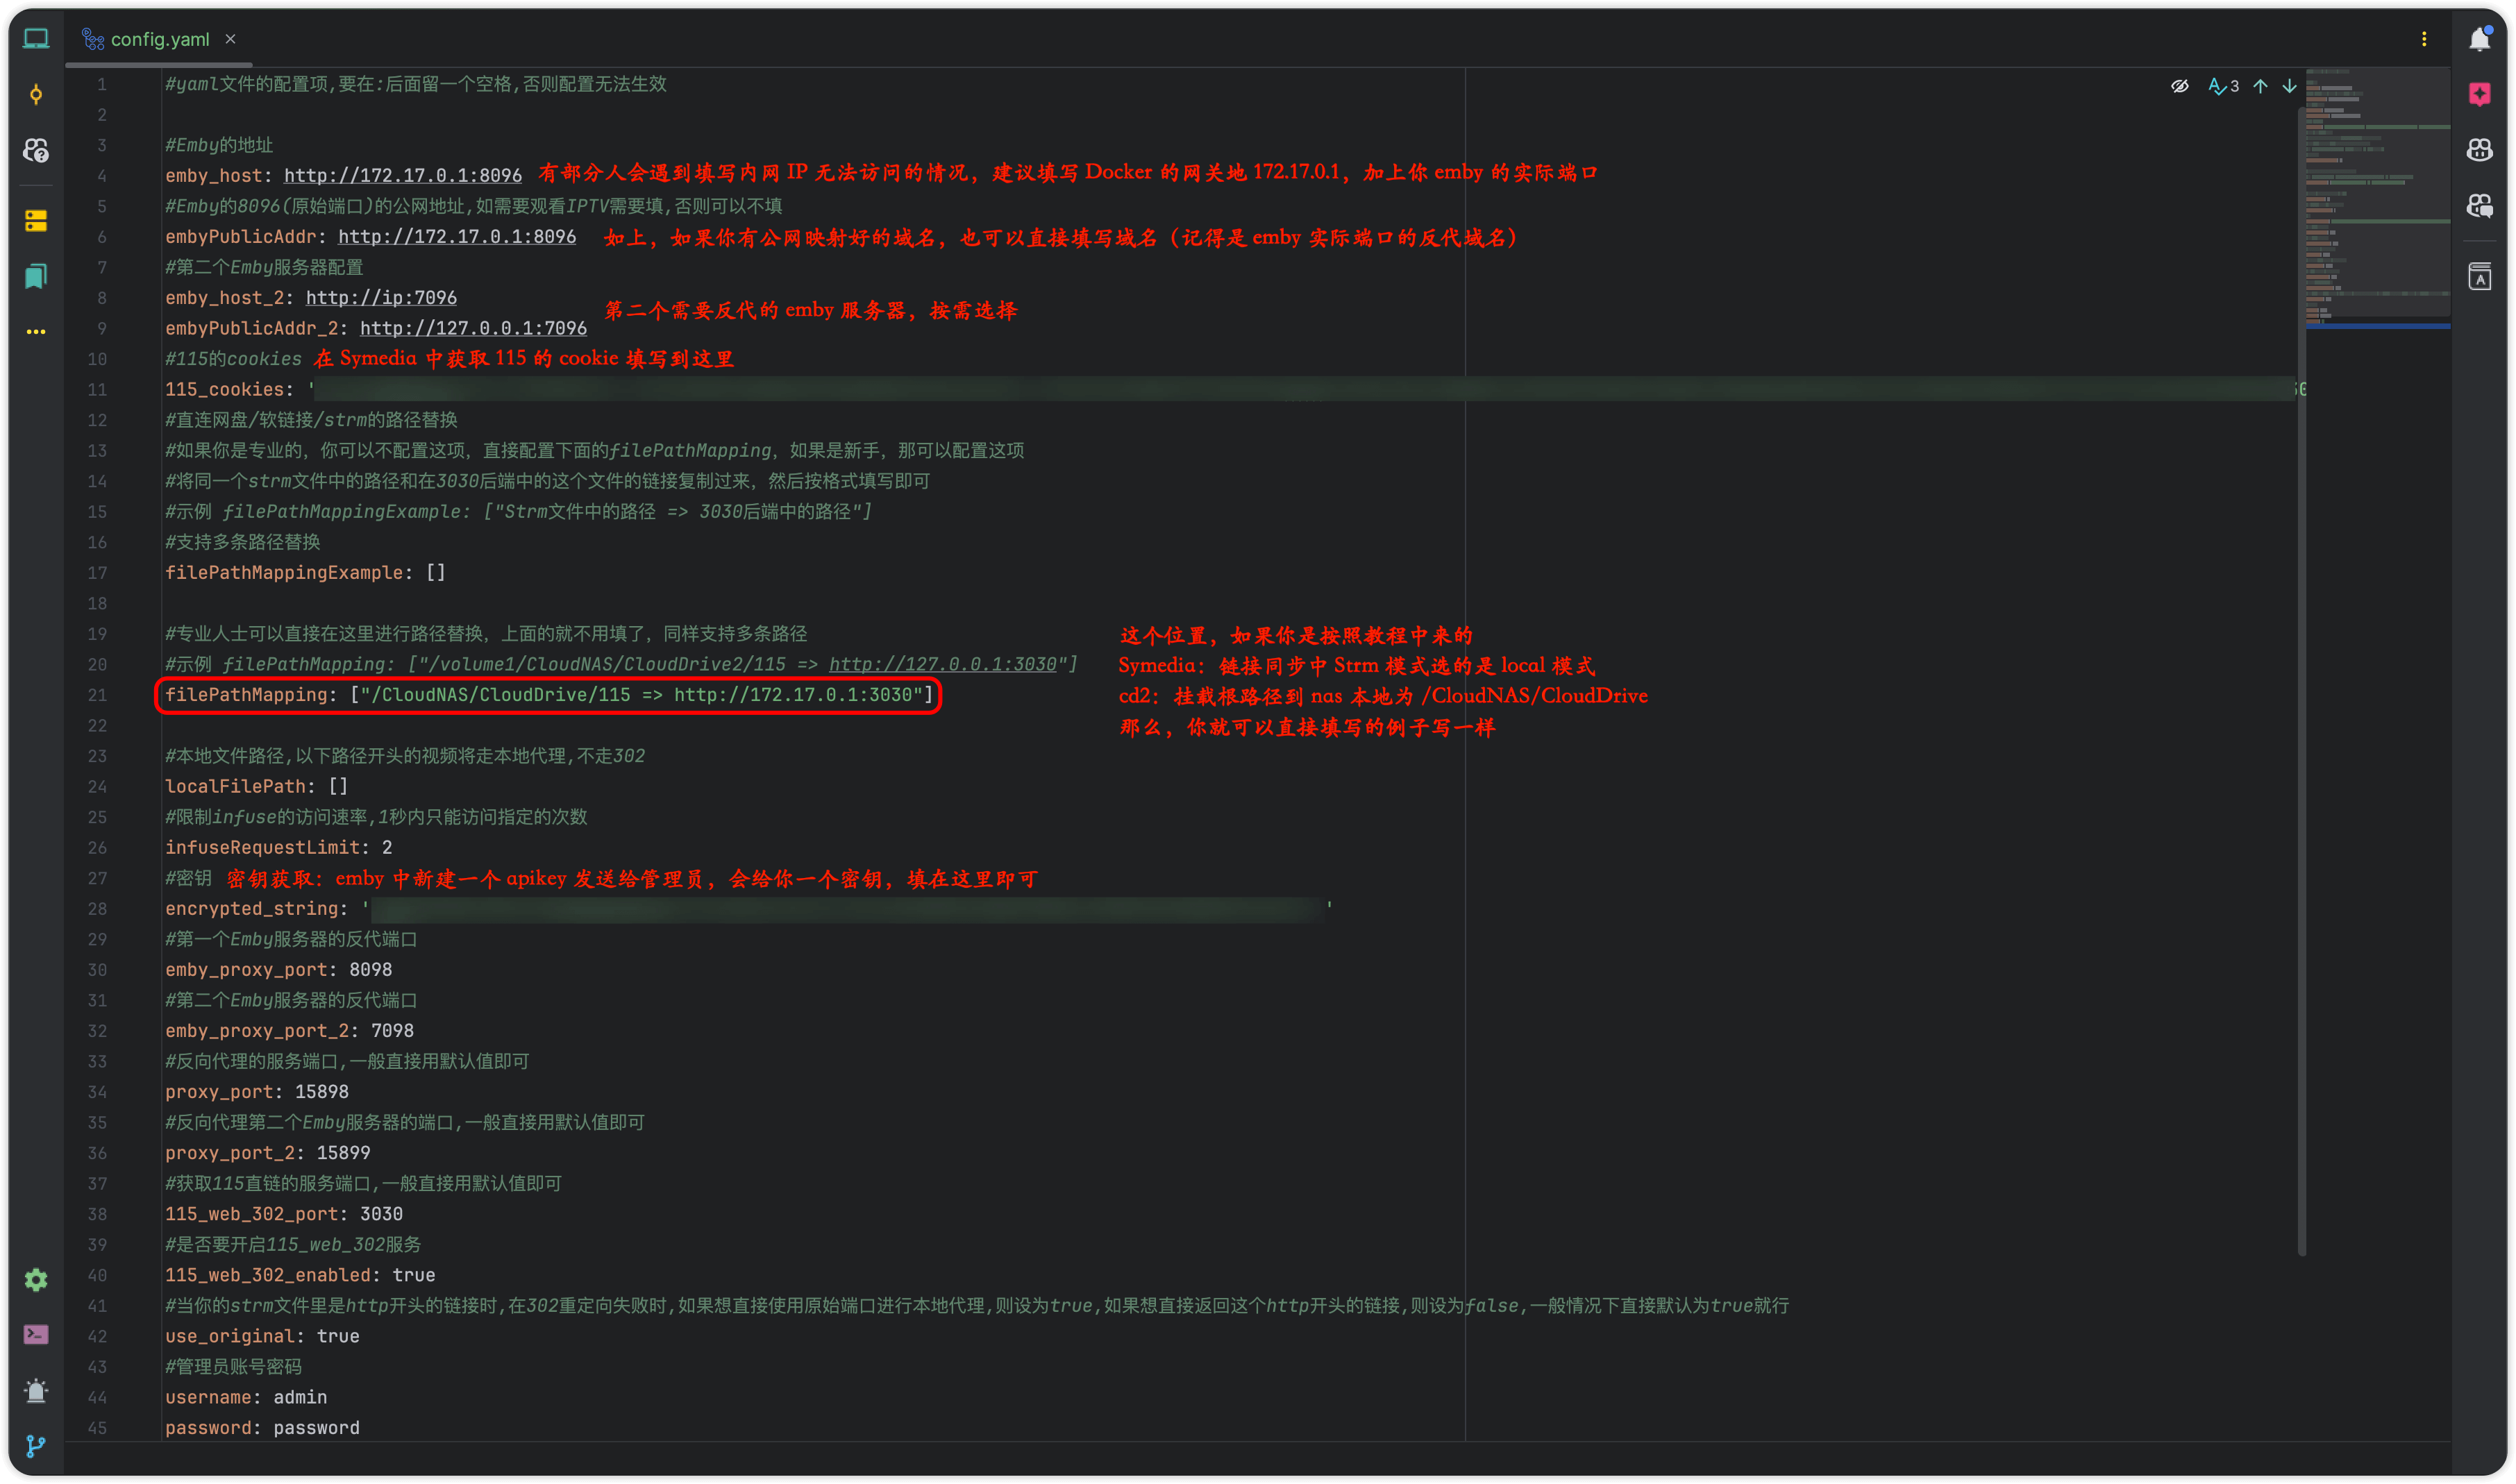
3.1 配置设置
启动完容器后,先打开配置文件中的 confifg.yaml ,需要手动配置一下,才能进入网页进行其余配置。
或者你要都在配置文件中配置完也可以。
这里附带 H 佬 更详细的食用教程
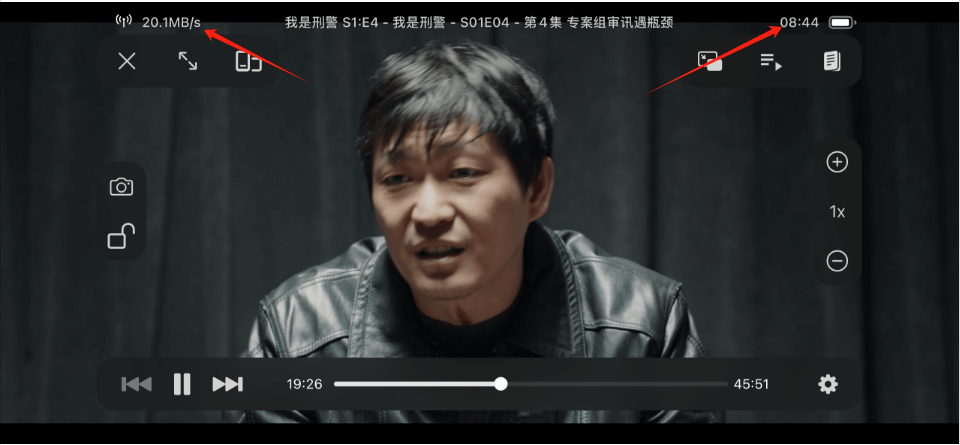
3.2 测试播放
注意:这里我们需要访问的是
8098这个容器端口,不是你自己的 emby 的8096端口
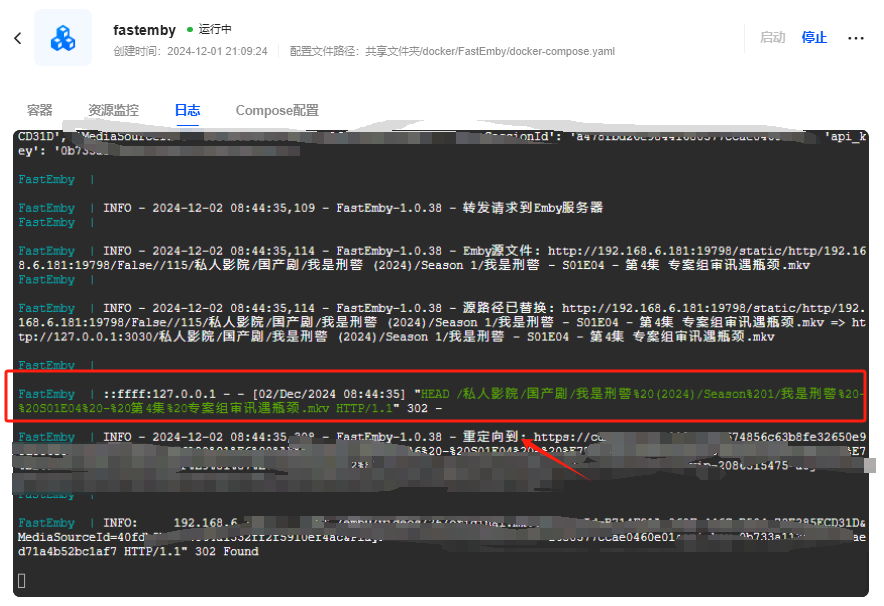
全部填写完后,重启即可。然后外网访问播放一下,查看日志看看是否走了网盘的 302 直链
以下借用 H 佬 的测试播放图片
我这边设备是 Iphone,测试软件为 Fileball,可以看到,成功走了重定向 302
打开 fastemby 的日志,可以看到,成功 302 了
七. 常见问题及注意点
注意:以下是个人食用
1. 已经存在的目录树流程
链接同步(生成目录树到本地)→ 通知 emby 入库 → emby 刮削 → 入库完成
2. 通过 SA 刮削流程
归档刮削(待整理的媒体库) → 链接同步(生成目录树到本地) → 通知 emby 入库 → emby 刮削 → 入库完成
参考资料
排名不分先后,按字母顺序排序,感谢大佬们辛苦开发,整理